Personal computing discussed

Moderators: askfranklin, renee, emkubed, Captain Ned

 
SecretSquirrel
Minister of Gerbil Affairs
Topic Author
Posts: 2726
Joined: Tue Jan 01, 2002 7:00 pm
Location: North DFW suburb...
Contact:

Re: My thoughts on the Prusa I3 MK3 3d printer kit

Sat Oct 13, 2018 11:02 pm

Pictures!!!!

What happens when you really mess up in the slicer....
Image

All the internal structure was missing because it was set to only print the surface contour.
Image

This is what it is supposed to look like.
Image

I've spent a lot of time learning how the various settings impact the print and fine tuning. In this series, you can see the layer seam. Each print want adjusting one or two parameters, until the last one, the seem was almost completely smooth. There is still a bulge where it transitions from a shell to solid infill near the top, but in general the surface is very smooth. The changes were mainly to retract, unretract, coasting, an linear compensation settings.

Another "oops" in slicer settings. This is actually an incredibly hard shape to print smoothly because of the extreme angle at the top.
Image

Here is what it is supposed to look like.
Image

Benchy. I have some spikes at the retract points. This was printed from pre-sliced gcodes included with the printer. Beyond the spikes and a few strings, it printed quite well. I have a bit of ringing in the X axis as the belt is probably a bit tight, but I'm not taking it apart at this point. It's not enough to annoy me and I'm afraid it will take an large amount of time to get things back to working this well.
[img]http://www.kovarindustries.com/coppermine/albums/userpics/10001/normal_IMG_20181012_192233714.jpg/img]

Image

I have been doing a little bit of CAD work as well. These are some pretty simple bits, but they turned out quite good.
Image

Its been a lot of "work" and I still have lots of learning to go. It will be a good while before I have a feel for the proper print settings for a model without printing a test first. I've been playing with both Slic3R PE and Cura and wish I could combine bits of both. The print simulation in Cura is quite handy and it is way more powerful. Or, at least it has way more settings and knobs to turn -- perhaps too many. Slic3R is easier to use and the ability to visualize the various types of print feature, as well as to readily highlight the retraction and unretraction points are also nice. Lots of learning to do...

All this printing has really taken a toll on my helper. She is just tuckered out...
Image

--SS
 
drfish
Gerbil Elder
Posts: 5546
Joined: Wed Jan 22, 2003 7:53 pm
Location: Zeeland, MI

Re: My thoughts on the Prusa I3 MK3 3d printer kit

Mon Oct 15, 2018 7:00 am

Crazy impressive for just a month of self-education. Thanks again for sharing. That last fin print is just bonkers.
 
SecretSquirrel
Minister of Gerbil Affairs
Topic Author
Posts: 2726
Joined: Tue Jan 01, 2002 7:00 pm
Location: North DFW suburb...
Contact:

Re: My thoughts on the Prusa I3 MK3 3d printer kit

Mon Oct 15, 2018 12:11 pm

drfish wrote:
Crazy impressive for just a month of self-education. Thanks again for sharing. That last fin print is just bonkers.


To be fair, I grew up building things from scratch, went to school in engineering, and have been programming computers since before I was a teen. As hobby/home users go, I'm probably in the group most likely to have success. Investigatory patience is key, doubly so we you start working with slicer settings as there are dozens, many of which interact. Change one at a time and understand its impact on the print quality. For that fin print, I cut the model down to the upper 15mm or so and printed about a half a dozen with different settings.

My biggest problem at the moment is time. Even with a small part of a model, its a 30 minute cycle time to test a change. At best, I might get three or four attempts in an evening, if I don't have anything else pressing. Large prints are in the 8-12 hour range, so I try and start one shortly before bed and another before I leave for work in the morning. If its particularly complex and takes much over about 10 hours, I might not get two prints in a day. Yet another reason I'll likely get a second printer in the not too distant future.

One thing I didn't mention -- space. The printer is obviously not small and takes a fair amount of desk space. One of my concerns with a second printer is where I will put it.

--SS
 
Captain Ned
Global Moderator
Posts: 28704
Joined: Wed Jan 16, 2002 7:00 pm
Location: Vermont, USA

Re: My thoughts on the Prusa I3 MK3 3d printer kit

Mon Oct 15, 2018 12:18 pm

SecretSquirrel wrote:
The printer is obviously not small and takes a fair amount of desk space. One of my concerns with a second printer is where I will put it.

Don't tell the cat what your plans are.
What we have today is way too much pluribus and not enough unum.
 
Usacomp2k3
Gerbil God
Posts: 23043
Joined: Thu Apr 01, 2004 4:53 pm
Location: Orlando, FL
Contact:

Re: My thoughts on the Prusa I3 MK3 3d printer kit

Tue Oct 16, 2018 9:38 am

SecretSquirrel wrote:
One thing I didn't mention -- space. The printer is obviously not small and takes a fair amount of desk space. One of my concerns with a second printer is where I will put it.

--SS

Bob Clagget (from YT I like to make stuff) has both of his under a desk he also has it enclosed to better control dust and temperature.
https://www.iliketomakestuff.com/buildi ... workbench/
 
godforsaken
Gerbil
Posts: 58
Joined: Sun Jul 03, 2005 6:34 pm

Re: My thoughts on the Prusa I3 MK3 3d printer kit

Tue Oct 16, 2018 4:20 pm

(spoiler, zero experience with 3d printers, proceed with skepticism)
noticed the strings on the boat test you did, then 3 days later see a video speaking about moisture buildup in filaments whose thumbnail showed that same boat test print, one with excessive strings (much more than your print), one with no strings.. along with print quality, the video (on a single set of tests) shows that excessive moisture in the the filament can also cause degraded layer adhesion strength which may be of interest to you especially for your RC plane wings, along with ways to resolve the issue

here is the link if you're interested https://www.youtube.com/watch?v=FAXUjZZER5E
 
SecretSquirrel
Minister of Gerbil Affairs
Topic Author
Posts: 2726
Joined: Tue Jan 01, 2002 7:00 pm
Location: North DFW suburb...
Contact:

Re: My thoughts on the Prusa I3 MK3 3d printer kit

Tue Oct 16, 2018 9:36 pm

godforsaken wrote:
(spoiler, zero experience with 3d printers, proceed with skepticism)
noticed the strings on the boat test you did, then 3 days later see a video speaking about moisture buildup in filaments whose thumbnail showed that same boat test print, one with excessive strings (much more than your print), one with no strings.. along with print quality, the video (on a single set of tests) shows that excessive moisture in the the filament can also cause degraded layer adhesion strength which may be of interest to you especially for your RC plane wings, along with ways to resolve the issue

here is the link if you're interested https://www.youtube.com/watch?v=FAXUjZZER5E


Moisture is definitely an issue. Doubly so since it has rained something like five of the last seven days and is supposed to rain off and on for the next week. My back yard squishes when I take the dogs out. Only so much I can do about that. That said, I'll try and post a couple of pictures tomorrow of some test prints from wing sections. The surface it probably about as nice as I could hope.

The Prusa gcode lays down a purge line outside the print area to prime the extruder and I have had at least one case of "explosive" bubbling from, what I assume is, excessive moisture.

--SS
 
SecretSquirrel
Minister of Gerbil Affairs
Topic Author
Posts: 2726
Joined: Tue Jan 01, 2002 7:00 pm
Location: North DFW suburb...
Contact:

Re: My thoughts on the Prusa I3 MK3 3d printer kit

Tue Oct 23, 2018 10:11 pm

Well, it looks like I get to tear down the hot end. :cry:

This evening, I ejected the filament to change back to silver and suddenly the extruder gears started skipping. The filament goes a ways in and then hits on something quite solid. Based on the approximate length, it looks like it's hitting on the lip of the heat break, where the PTFE tube sits in. If I had to guess, I'd say a bulb on the end of the filament, at some point in the past, pulled the PTFE tube up to the very edge of the heat break and it finally worked its way out.

So, now I have to decide whether to deconstruct the majority of the x axis and adjust the belt tension, or just to take the hot end out. I know I can take the hot end out with the x axis in place, as I have done it before.

--SS
 
Chuckaluphagus
Gerbil Elite
Posts: 906
Joined: Fri Aug 25, 2006 4:29 pm
Location: Boston area, MA

Re: My thoughts on the Prusa I3 MK3 3d printer kit

Wed Oct 24, 2018 8:56 am

I had to take apart the extruder assembly once, when I was first trying to use flexible filament - at default speeds it would jam up in the nozzle and then filament would start shooting out the side of the feeder assembly, and somehow or another it tied itself in a knot. Fortunately, having followed the instructions to assemble the extruder in the first place, it really wasn't that hard to take the thing apart and then reassemble it properly. Another point for good documentation. Also, I realized that slowing the printing down helped a ton with flex filaments.

I haven't had any problems with humidity so far, but I've got central air in the house, and it's usually not all that humid here outside of a month or so in the summer. I gather it can be a terrible issue with PLA especially.

Also, I realize that you're dealing with a misaligned PTFE tube, but have you picked up any cleaning filament to help keep particles from clogging in the extruder? I grabbed some cheap eSun cleaning filament early on, and I use it whenever I'm switching filament types, or just every few weeks in general. It's cheap, and a little goes a long way, and I figure it should help.
 
SecretSquirrel
Minister of Gerbil Affairs
Topic Author
Posts: 2726
Joined: Tue Jan 01, 2002 7:00 pm
Location: North DFW suburb...
Contact:

Re: My thoughts on the Prusa I3 MK3 3d printer kit

Thu Oct 25, 2018 8:30 pm

Turns out I was wrong. It wasn't that the PTFE tube had dislodged, though it had pulled up slightly. There was a small chunk of filament that had broken off and was lodged in there. I ended up having to completely disassemble the e-axis. I pulled the heater and thermistor out of the heating block. Then pulled the entire hot end out of the x carriage. To get the piece out, I had to unscrew the heat break from the heat sink. I dusted and checked the x-axis cable tension while I had everything apart.

Everything is back together and its printing again. It only took about an hour to do the tear down and rebuild. I spent probably two hours re-calibrating things after I put it back together. I still haven't gotten the first layer back as good as it was, but the print quality is still fine. Once I put it all back together, I wiped down the the x and y rods to get the residual gunk off and lubed the rods and bearing with good ole 3-in-1.

I was a bit annoyed that I hadn't printed the various parts I wanted to upgrade since I had the hard bits taken apart. Once I get finished printing the current set of jobs, I'll probably go ahead and print out the parts and put them in the corner for the next time I have to do maintenance.

I haven't worried about cleaning filament to this point as I haven't printed anything but PLA to this point. However, I'm about to venture into the realm of flexible filament, and well as PETG for the upgrade parts, so I went ahead and ordered some.

--SS
 
SecretSquirrel
Minister of Gerbil Affairs
Topic Author
Posts: 2726
Joined: Tue Jan 01, 2002 7:00 pm
Location: North DFW suburb...
Contact:

Re: My thoughts on the Prusa I3 MK3 3d printer kit

Sun Oct 28, 2018 8:50 pm

Today I made the first attempt a printing something other than PLA. Did I got to PETG, or some other stiff filament? Of course not -- NinjaFlex or die! I've done a good bit of reading and was prepared to spend most of the afternoon fighting with it. The parts were pretty simple: the main gear and tail wheel tires for the 3dlabprint Edge 540. So, what was the result?

Image

That was the first attempt.

Part way through the print, you can see the infill.
Image

Printing the first solid top layer -- there we three more after that.
Image

You can see the stringiness in the wider shot, after the print completed.
Image

All cleaned up and installed on the wheel.
Image

So my profile likely needs more tuning, if I we going to do something silly and print something like a benchy out of NinjaFlex. It works fine for tires though. I used PVA glue on the bed to provide a release agent. I was able to peel the tires off the build plate with only a bit of effort. I probably went a bit overboard with the glue stick, especially on the second main tire. It makes the bottom surface a bit less smooth. A good process seems to be to rub on a thick layer of glue, then take a damp coffee filter and smooth it down to uniform layer. Seems to give a good surface and releases well.

Somehow or another I managed to get a pinhole in my second main tire so it isn't completely sealed. Luckily it doesn't matter for my application. Still annoying, as the first one seems to be completely sealed.

For all the concern I had after reading about people's efforts at printing TPU in general, it turned out to be a bit "non event". I've got some PETG printing I should do now.

--SS

*edit* One thing I learned when printing these tires -- the print cooling fan makes a horrible noise when run at less than 100%. The TPU profile I was using had the fan set at 30% after the first layer. Apparently the PWM frequency for the fan speed control is well within the audible range. The fan itself is a three pin fan, the the controller is PWM modulating the actual fan power, and not just a control signal. Poor design and quite painful on the ears if you need something that is not 0% or 100%.
Last edited by SecretSquirrel on Sun Oct 28, 2018 9:25 pm, edited 1 time in total.
 
SecretSquirrel
Minister of Gerbil Affairs
Topic Author
Posts: 2726
Joined: Tue Jan 01, 2002 7:00 pm
Location: North DFW suburb...
Contact:

Re: My thoughts on the Prusa I3 MK3 3d printer kit

Sun Oct 28, 2018 8:56 pm

Oh, an in case anyone thinks all I print it airplane stuff...

My daughter was home from college for a long weekend. She has been lobbying us to let her take one of the dogs back with her, which she isn't ready for yet. But, as a compromise, I sent her back with her own puppy. :wink:

Still on the build plate, with supports.
Image

All cleaned up.
Image

She also happens to love elephants.
Image

--SS
 
SecretSquirrel
Minister of Gerbil Affairs
Topic Author
Posts: 2726
Joined: Tue Jan 01, 2002 7:00 pm
Location: North DFW suburb...
Contact:

Re: My thoughts on the Prusa I3 MK3 3d printer kit

Sun Oct 28, 2018 9:20 pm

My thoughts, a bit over a month in...

I'll buy another Prusa I3 MK3 kit, probably in the spring.

It's not perfect, buy any stretch. The power supply is undersized and almost certainly will fail at some point for people running on 120V. The y-axis belt alignment needs some work. The power failure detection and restart is way too touchy and may or may not save your print anyway. It works, but I ooze enough filament during heating that restarting leaves a huge blob. The filament sensor is apparently nothing but trouble -- I have no experience with it, it has remained disabled on my printer from the beginning. All that said, the base platform seems to be solid and I found it relatively easy to dial it in to the point of producing relatively high quality prints.

Could I get equivalent quality from a cheaper printer? Probably. However, I get the feeling that it would be more of a crap shoot. So, if I get a $400 Chinese clone, then spend hours and a couple hundred dollars on upgrades and fixes, I might as well go with something I'm already familiar with. As it sits, I figure it's about $100 is upgrades/replacement parts for the MK3, with the main items being the power supply and springs for the bed.

Would I recommend a MK3? Yes, with caveats. If money is more valuable than time, then you can probably get by with a cheaper clone. If you are looking for a ready to go, out of the box, printer, you can probably spend another $500 and get a more ready-to-go solution. I see the MK3 as filling to upper end of the DIY space, and it seems to do that well. Also, as I have noted before, I like supporting those trying to do open source hardware, so buying from Prusa, rather than a knock-off, is a plus for me, even at the higher cost.

--SS
 
drfish
Gerbil Elder
Posts: 5546
Joined: Wed Jan 22, 2003 7:53 pm
Location: Zeeland, MI

Re: My thoughts on the Prusa I3 MK3 3d printer kit

Sun Oct 28, 2018 9:30 pm

Thanks again for these updates. :)
 
SecretSquirrel
Minister of Gerbil Affairs
Topic Author
Posts: 2726
Joined: Tue Jan 01, 2002 7:00 pm
Location: North DFW suburb...
Contact:

Re: My thoughts on the Prusa I3 MK3 3d printer kit

Fri Dec 07, 2018 1:48 pm

Somewhere early in this thread, someone mentioned that they would be interested to see what my thoughts were after a significant amount of time with the printer. So far, I think it has been generally positive. While I had may share of issues to address, and it is certainly not a put it together and go type situation, since I have addressed those issues, the printer has worked without issue. I have run into one longer term problem. The linear bearings for the Y axis have started to score the Y axis rods. Early in the Mk3 life, Prusa shipped a number of printers with un-hardened rods. You can find several discussions in the Prusa forums. The unhardened rods would get scored rapidly. My printer has the proper hardened steel rods, and still, one of the two (left looking at the front) is showing signs of scoring. The design of the linear bearing attachment to the print bed makes it very easy to deform the linear bearing casing and cause one or more of the ball bearings to seize. Over time, this will score the rod. The bearing attachment is just a U bolt through the print be frame and if you over tighten, the U bolt puts pressure on the bearing case in a very small area. So, the scoring is likely an assembly problem on my part, but its a weak design that allows it in the first place. The spring kit will uses bearing attachment parts for Thingiverse (something like this: https://www.thingiverse.com/thing:3214732). In the mean time, I rotate the Y axis rod about 15 degrees so that the bearings will wear on a different part of the rod.

Now, I still have print problems from time to time, but they are all of the type that are common to all 3d-printers. Occasionally I'll get bed adhesion issues. Most of the time, print problems are because I screwed up a slicer setting and asked the printer to do something silly, or beyond its capability.

I haven't actually been printing a lot since Thanksgiving due to my lack of time to do things. I decided it would be good to print some things from Thingiverse since the printer wasn't doing much else.

This is a model of an automatic transmission. Its a fully operational 6 speed transmission, plus reverse. Fully printed, no external parts. You can just barely make it out in the picture, but the brakes used to hold the sun gears in place are actually printed as integral parts of the frame. They just snap loose after printing. Their pivots are printed in place. Was actually pretty impressive.

Image

Yesterday afternoon, I stumbled across this Christmas tree. You can only slice it with a slicer that lets you assign different print processes to different parts. I used Simplify3d, since I have it.

Image

Once I printed it, I decided it needed a "tree topper", so I went and found a star and scaled it down to a size that worked with the tree.

Image

Last night, I decided to print a DNA desk tchotsky as it is rather appropriate because of where I currently work.

Image

Image

Image

The first image really is the print sitting on the buidl plate as it finished. No supports. For size context, its about 6" tall and the runs are about 2" in length. If you look very closely, you can see a slight convex shape to the bottom of the rungs due to sagging, but there is no layer separation and the whole thing is quite smooth, even at 0.2mm layer hight. I started the print right before I went to bed and I was a bit nervous about what I was going to find when I got up. I was pleasantly surprised, to say the least.

I'm traveling with work next week, and if I can get time to take some measurements this weekend, before I leave, I'm going to try and use my evenings to do some CAD work on an enclosure for a project I'm working on. I will, of course, post an update when I finally get it done and try and print it.

--SS
Last edited by SecretSquirrel on Wed Feb 27, 2019 7:42 am, edited 1 time in total.
 
SecretSquirrel
Minister of Gerbil Affairs
Topic Author
Posts: 2726
Joined: Tue Jan 01, 2002 7:00 pm
Location: North DFW suburb...
Contact:

Re: My thoughts on the Prusa I3 MK3 3d printer kit

Tue Dec 11, 2018 10:44 pm

I did my first multi color print. Note that I don't have the Prusa MMU, so I'm doing it the old fashioned way -- manually changing the filament.

Image

Image

Image

This is also a pretty good test piece for the printer as well. The helix is printed without support so the "base pairs" are completely bridged sections. The one in the picture on my desk was printed as fast as the printer would run. It took about 2hr 50min to print.

Short video of one of the "base pair" segments being printed.
https://youtu.be/bNO2kDUSjEs

The multi color printing turned out better than I was expecting. That said, doing a complex multicolor print with manual filament changes would be tedious at best. I also still have a bit to work out with Simplify3D, to make it generate g-code that I don't have to edit afterwards.

--SS
 
SecretSquirrel
Minister of Gerbil Affairs
Topic Author
Posts: 2726
Joined: Tue Jan 01, 2002 7:00 pm
Location: North DFW suburb...
Contact:

Re: My thoughts on the Prusa I3 MK3 3d printer kit

Thu Feb 07, 2019 4:56 pm

Just wanted to come back after several months of printing and give some more thoughts. I've gone through an entire roll of PETG. Other than fuzz on some prints with multiple parts on the plate, I've had almost no problems at all with PETG. I'm using Magigoo as an adhesion/release agent on the build plate. Good stuff. To this point, the only change I have made to the printer is to switch from the Prusa spool holder to a pair of these. Definitely worth it. Makes for a much smoother filament feed.

I have run into a few problems, though generally minor. On the very minor side, the fuzz on PETG prints has a tendency to collect on the heater block and melt. It explains why some of the nozzle/heater block pictures I have seen were so ugly. I'll wipe off the nozzle and heat block with a coffee filter every few prints, while its hot to clean it up. Less minor, the black PETG I'm using does have a slight tendency to trigger the filament run-out sensor. The good news is that the prints all resumed and completed cleanly. Its a known problem with the Mk3 filament sensor. Also related to PETG is the cooling fan PWM. If you aren't running at 100%, the PWM frequency is very audible and makes for a very loud fan, especially since the default PETG cooling settings run the fan at 30%. There are a couple of suggested fixes in custom firmware that all have their downsides.

One of the reasons for all the PETG printing is that I'm getting ready for the first major maintenance/tear down. Actually, major may be an overstatement. I'm not planning of tearing down the extruder or X axis. I'm getting ready to put it in an enclosure, which means removing the power supply. I'm also going to replace the Y axis motor mount and idler/tensioner, the Y axis bearing U bolts are getting replaced with straps. I'm also going to replace the PLA Y rod mounts I printed early on with PETG prints. While I have the Y carriage off, I'm going to check the rods and bearing and lube them up well.

Almost six months in, I'm happy with the purchase. For what it is, and what you pay, I think the only real weak spot is the power supply. Yes, there are some other minor issues, but this is still a DIY/hobbyist printer. Admittedly it is at the upper ends on the price range, but for 99% of the fiddling and print issues I've run into, its be a PEBKAC issue and not the printer's fault in any way. I'd love to have the money and time to pick up something like a Creality Ender3 and an Ultimaker 2 Extended, or something similar, and see what the value proposition really is. However, without anything to compare it too, I'd say I'm happy with it, and if budget, time, and need are there, will get a second one.

--SS
 
SecretSquirrel
Minister of Gerbil Affairs
Topic Author
Posts: 2726
Joined: Tue Jan 01, 2002 7:00 pm
Location: North DFW suburb...
Contact:

Re: My thoughts on the Prusa I3 MK3 3d printer kit

Mon Feb 25, 2019 10:15 pm

Since people were curious what I would think down the road, and others were following with interest because their were thinking I getting one too, I'll add some more updates.

First, I want to retract one of the statements I made earlier, at least partially. The stock Prusa power supply isn't underpowered -- most of the time. Especially with the latest firmware (more on that later). During printing, both the bed and hot end are operating in PWM mode, which means the load on the power supply should be considered the time average, not the instantaneous load. A well designed power supply should be able to put out it full rated load for some period of time (usually in the specs). A well designed power supply should protect itself from damage, but otherwise be able to exceed its rated output for some (shorter) period of time. The Prusa supply does both just fine and the PWM control of the two heaters means that the average load over time is well within the power supply limits. I'd estimate that the worst case load when printing PLA is under 50%. Now, there is one point at which the supply is mildly overloaded for a significant period of time: initial warm up, especially for something that requires high bed temperatures, like ABS or polycarbonate. When the hot end and bed are both initially heating, the are one 100% so you are pulling at or slightly above the rated power supply capabilities. You can reduce the stress by heating them sequentially instead of in parallel. Is running the supply at 110% for a few minutes and print start a problem? Only time will tell there.

Prusa addressed on of the power supply issues with the latest firmware. The annoying click, in phase with the bed PWM has been fixed. The bed PWM frequency was raised to 62.5 Hz and given 128 levels. The PID algo is now a bit more gentle in ramping up PWM so the power supply doesn't go from nearly idle to 8A in microseconds.

As a last note on power supply stuff, it appears that some of the early Mk3 supplies did have an under spec part in them. The PTC themistor used for inrush limiting was to small and could go into thermal run away, resulting in spectacular failure. The power supply was updated to use a larger thermistor. My supply has the larger thermistor. I haven't put my stock supply back in service though. Mainly because I don't have a whole lot of reason to. The Meanwell is working just fine and I printed a new top panel and fan mount to an Arctic F8 Silent.

Image

That change adresses the one problem I had with the Meanwell. The stock cooling fan was a small, noisy thing.

Now, on to further adventures in 3d printing.

My printer recently got a new home.

Image

Image

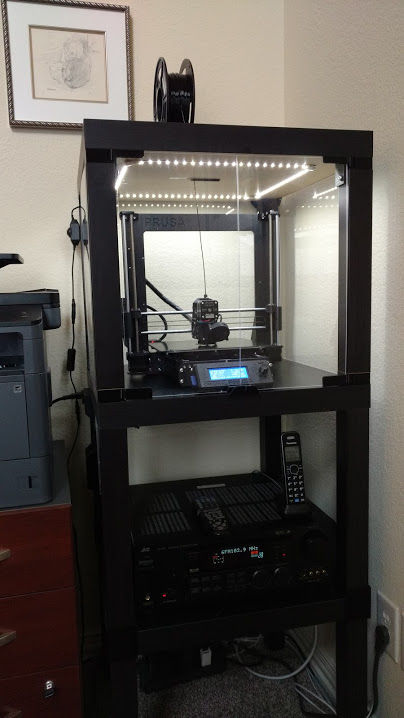
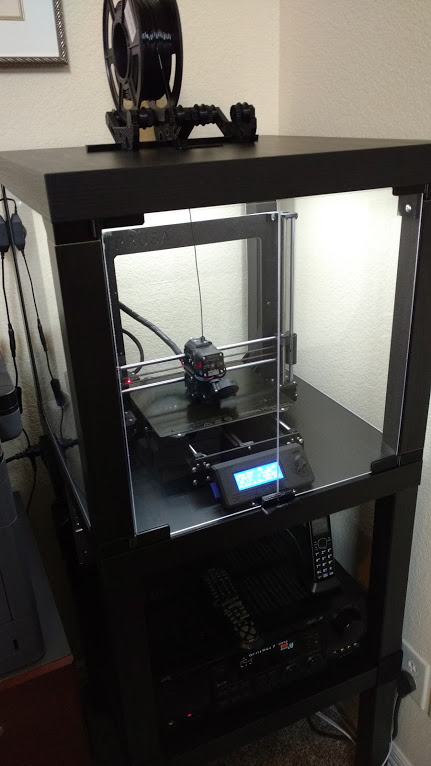
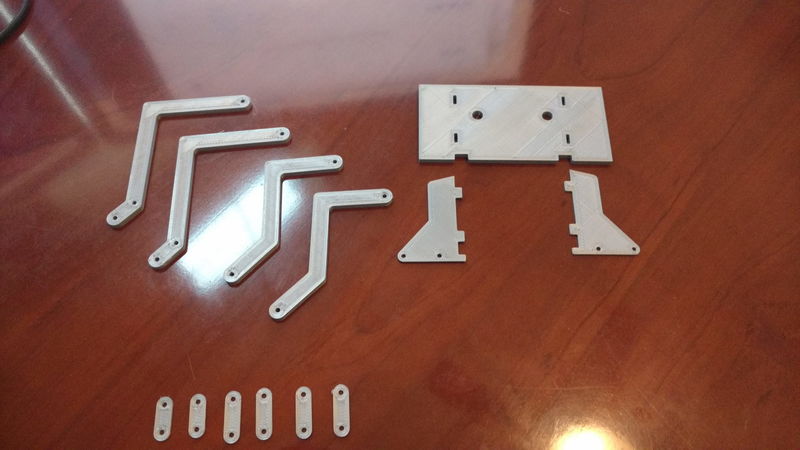
That's a Lack enclosure, based on the plans Prusa has on their site. The LED strips are drivin from a seperate 12V supply with a brightness control (you see it on the back left). The enclosure does very little for noise, but it helps stabilize the temperature for long running prints. It also, as important, helps keep dust and pet hair off the printer. It isn't in the above picture, but I have since dug out on of my Raspberry PI 3b's and camera. The camera is mounted in the front, top right. The Pi is just sitting on top of the enclosure for the time being. The Pi is running Octoprint. The Pi camera doesn't do the best for print pictures, but it's sufficient for monitoring the printer.

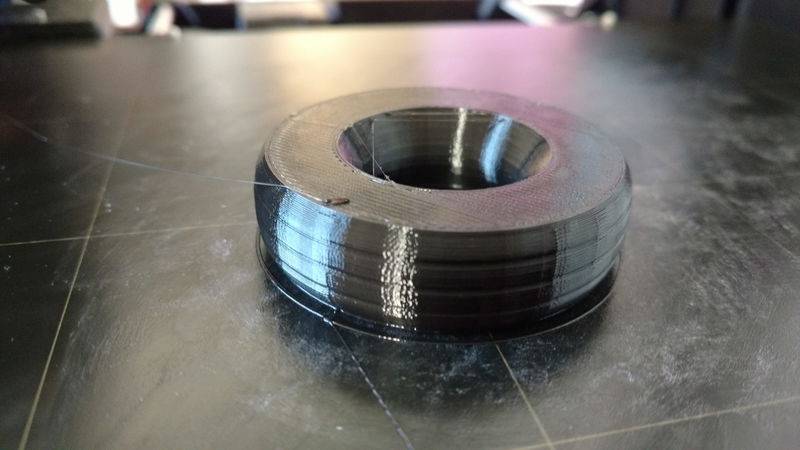
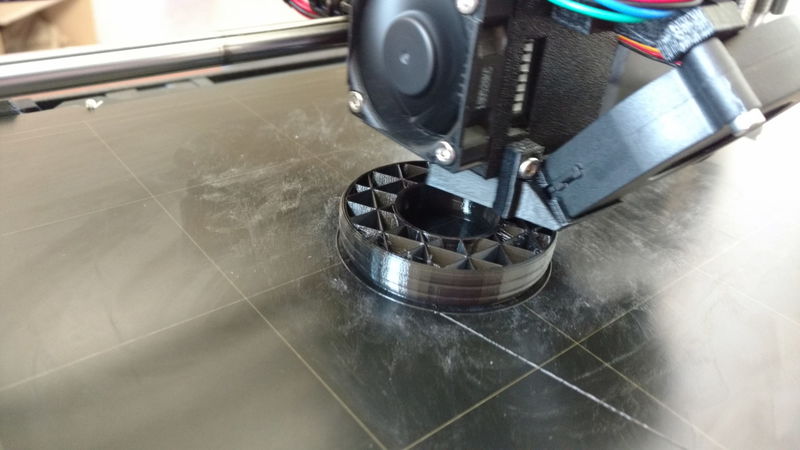
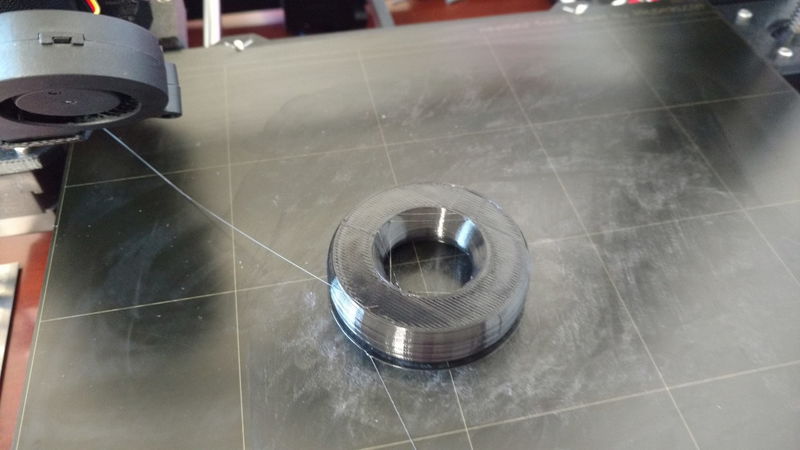
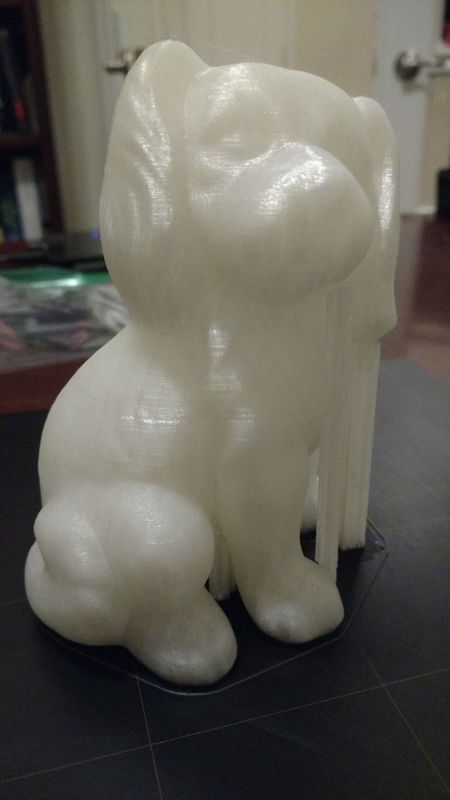
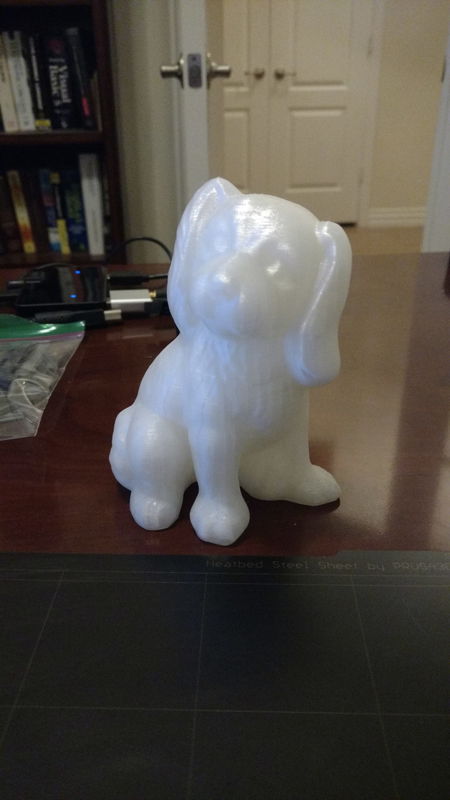
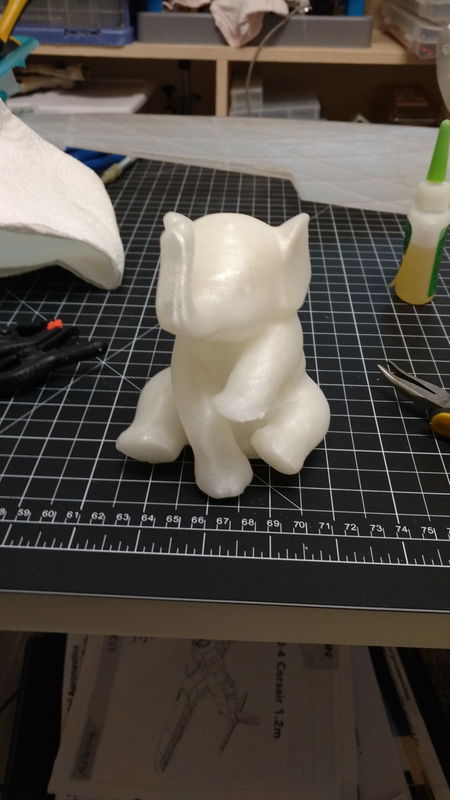
This weekend, I installed a 0.25mm nozzle to do some printing of highly detailed models. That eventually led to taking apart the extruder for the second time since I owned the printer. I was having issues with the extruder skipping for time to time, it was mainly just on the initial purge line. I got a print started and it looked to be running well before I for work. I got home to find the the printer had stopped extruding after about 3mm into the print and had been printing nothing for the next 10-15mm of Z height. The extruder was completely jammed. After much picking at it, I was able to get the filament out, but I went ahead and tore it down to check everything. The PTFE tube is showing the signs of abuse, but wasn't bad enough that I couldn't put it back together. I did order some new PTFE though. Right now, I'm blaming the skipping and blockage on the filament. Its Prusa white PLA. I had a spool of white PLA from 3D Solutech that I switched to and things are behaving much much better now.

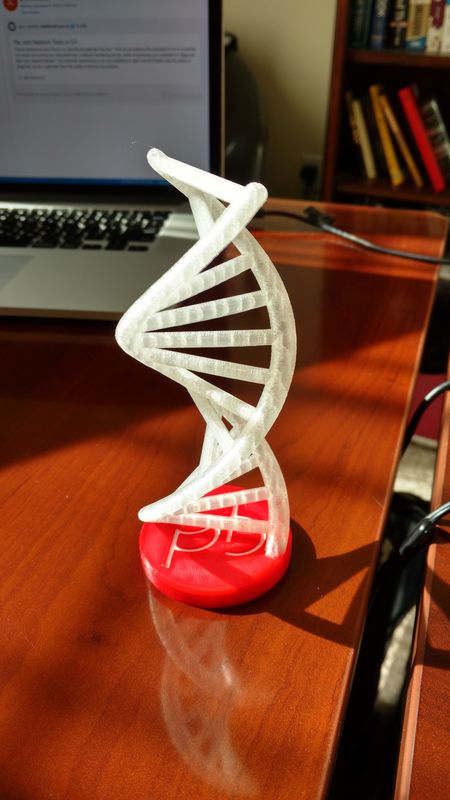
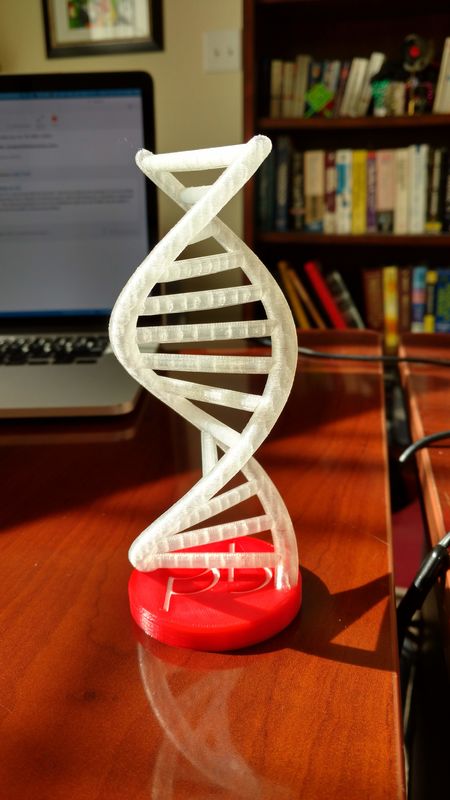
The nozzle switch required resetting the Z offset and so I took the opportunity to re-level the bed, as the smaller layer heights will be more sensitive of variations in the bed. One thing to note, which I learned to hard way, the Mk3 has a firmware limit on the first layer of 0.15mm. You can't print with a 0.1mm first layer. Annoyingly, Slic3r PE won't give any warning if you try a 0.1mm first layer. It happily sets up the extruder flow for 0.1mm and tells the printer to print at 0.1mm. The printer happily ignores the layer height and prints at 0.15mm. The result is pretty much zero adhesion and very little hint as to why. I started out printing 0.15mm think calibration squares to set the Z offset and was very puzzled why they looked great, but the follow on 0.1mm squares were crap. Even worse, when you print multiple layers with the first layer at 0.1mm, the first layer is printed at 0.15mm Z, probably with no adhesion. If you get it to stick well enough to continue to the second layer, the second layer prints at 0.2mm, which is effectively a 0.05mm layer thickness, since the first layer was 0.15mm thick. Since the extruder is still trying to shove enough filament through for a 0.1mm layer, bad things happen. That may also have contributed some to my problems with the Prusa filament, but it certainly wasn't all of them.

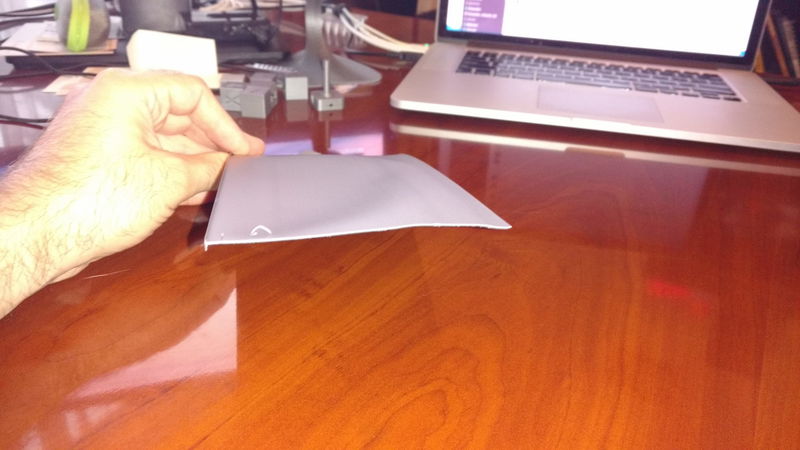
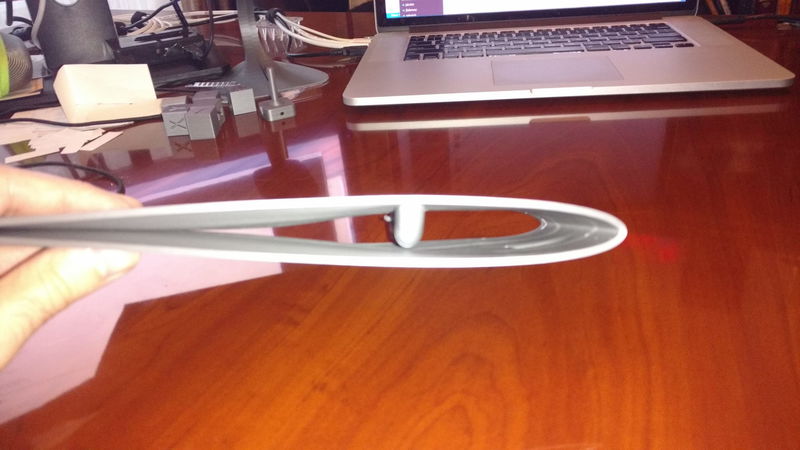
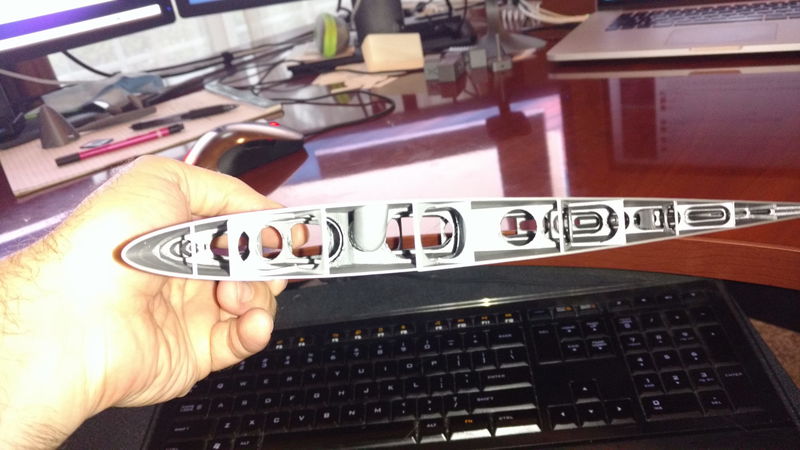
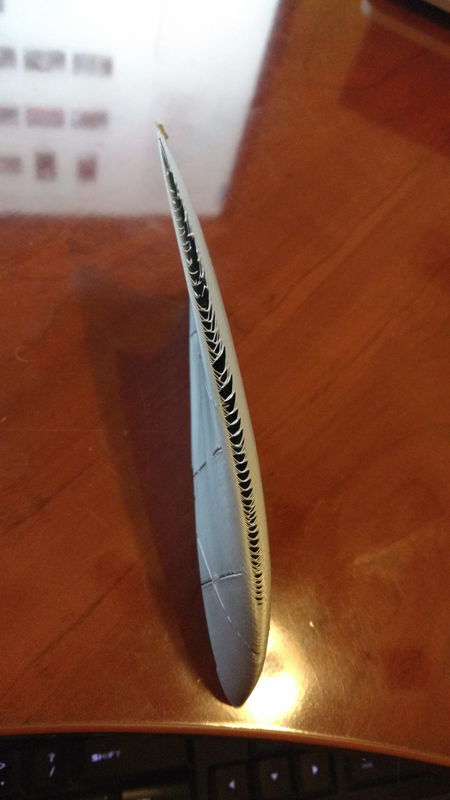
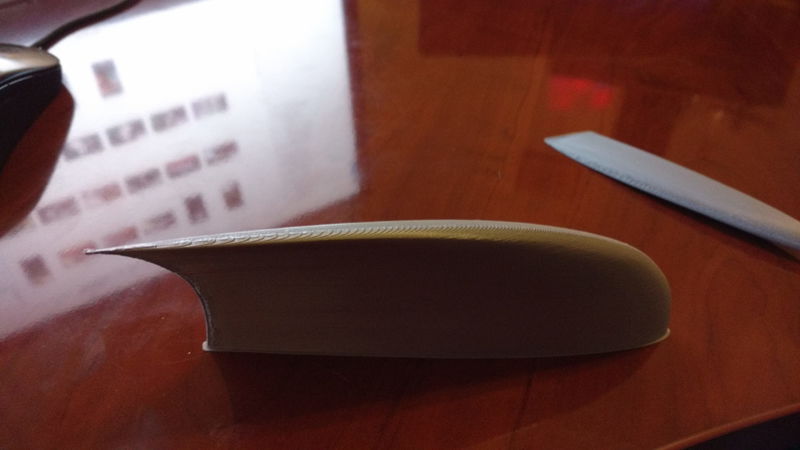
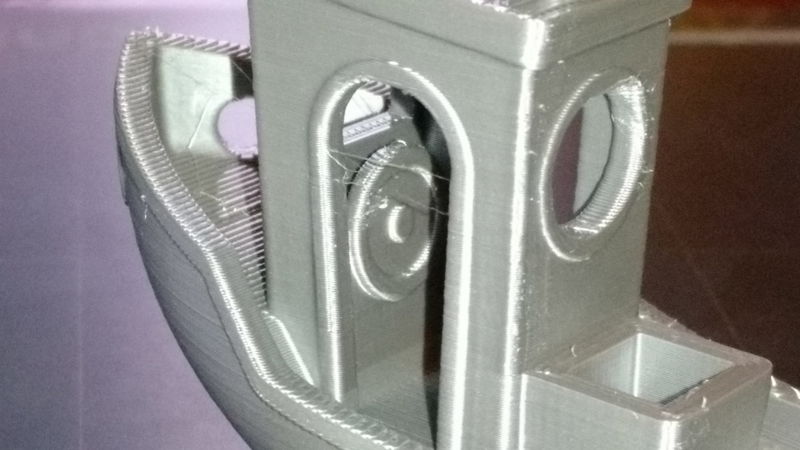
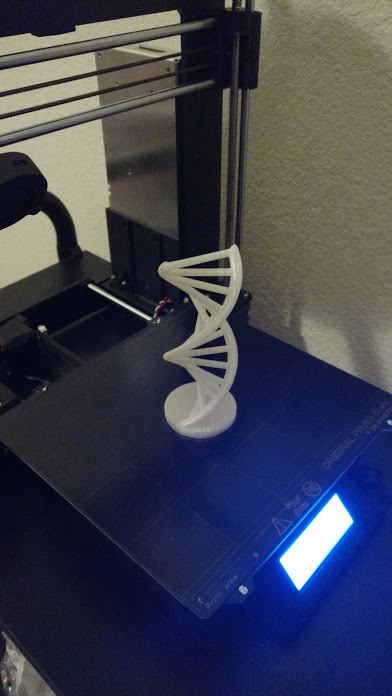
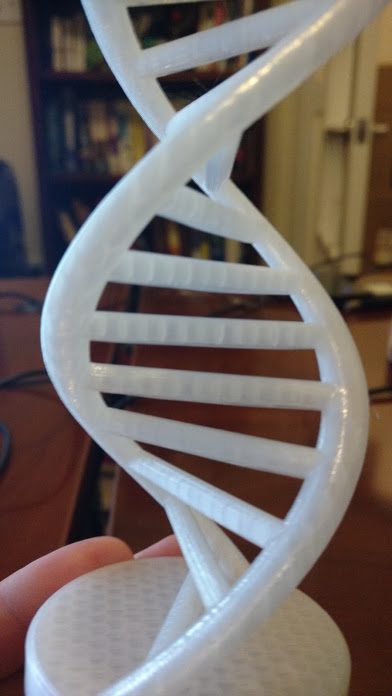
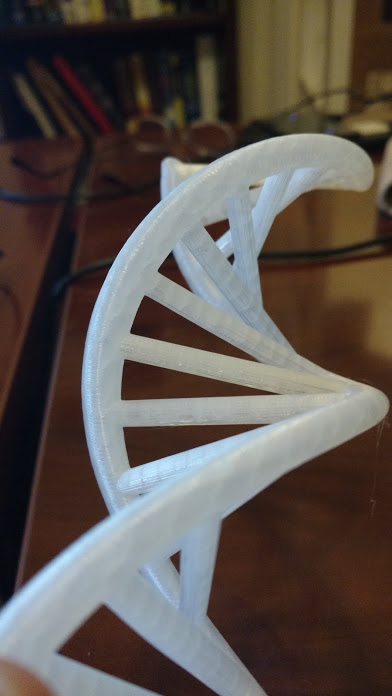
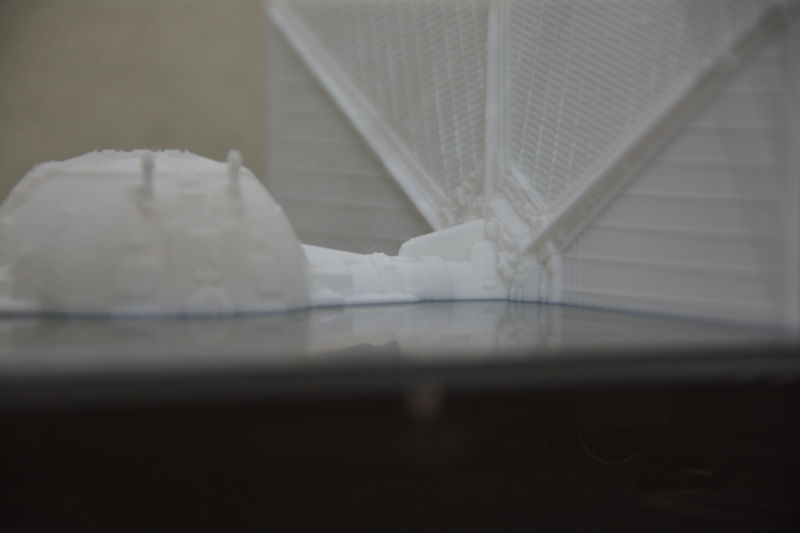
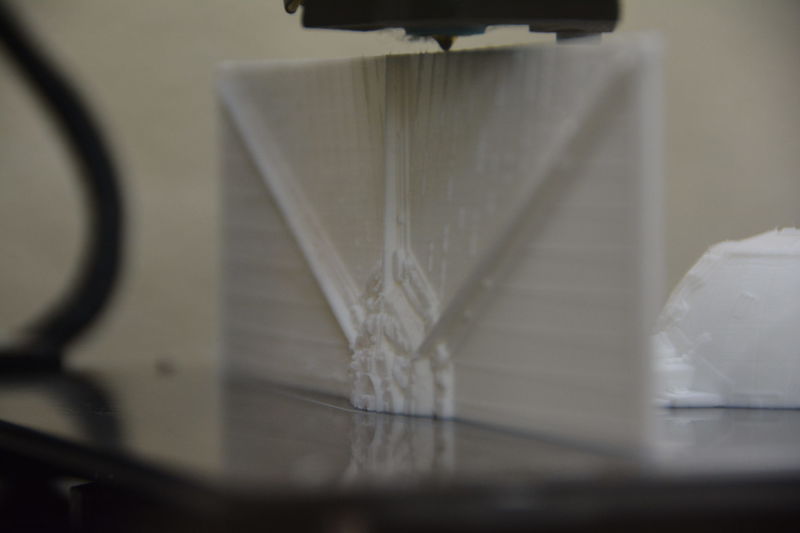
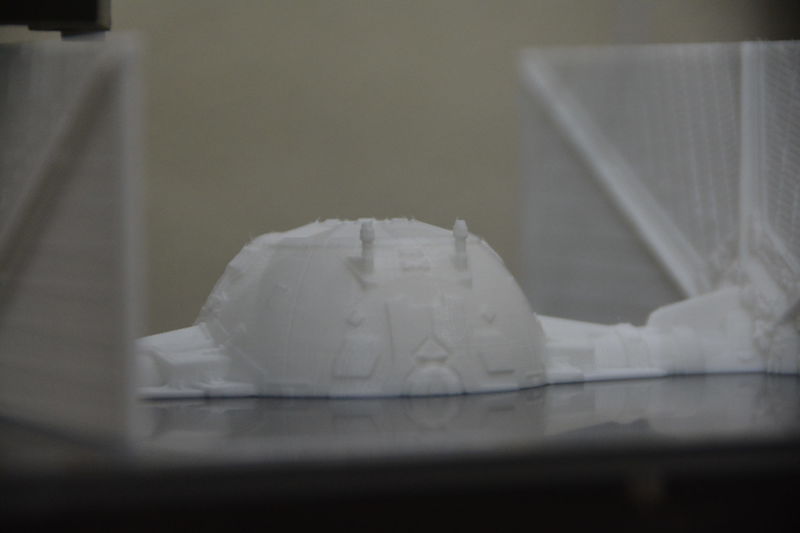
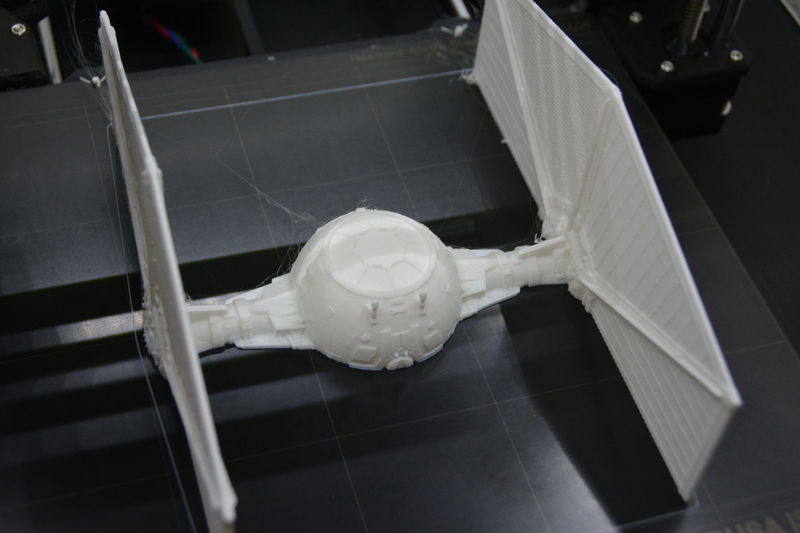
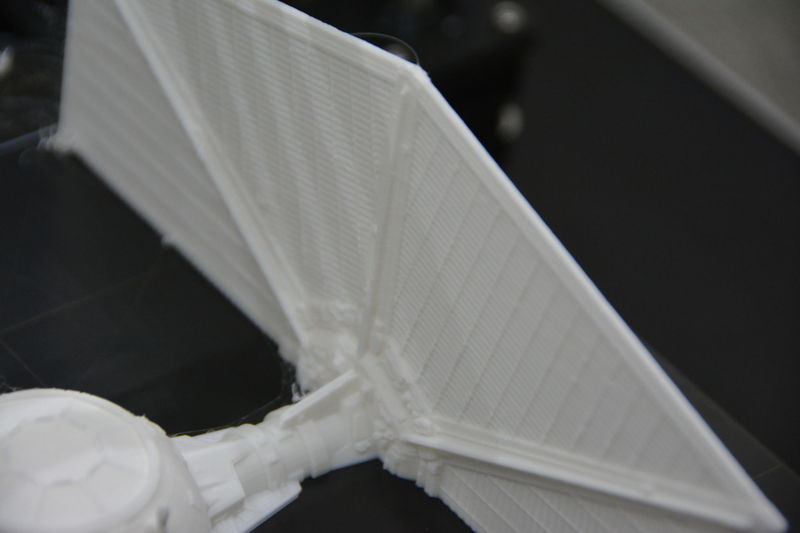
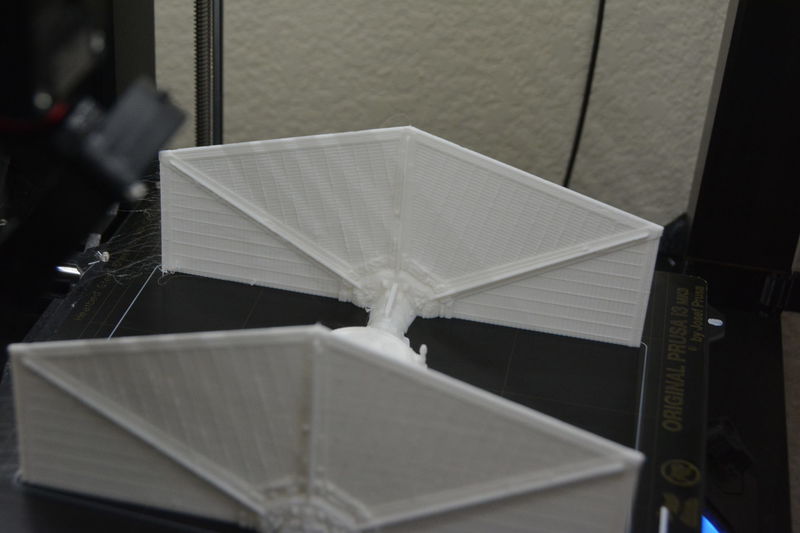
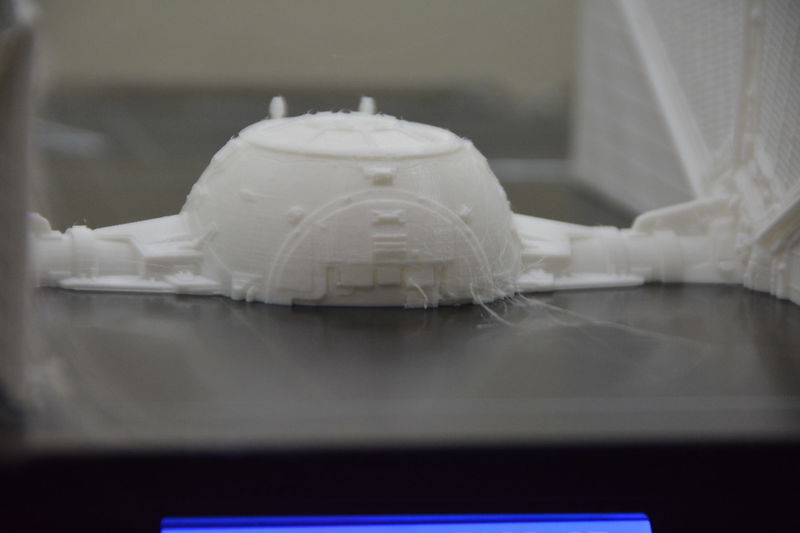
I've got the first half of a very detailed Tie Fighter model printing at 0.1mm height.

Image

Image

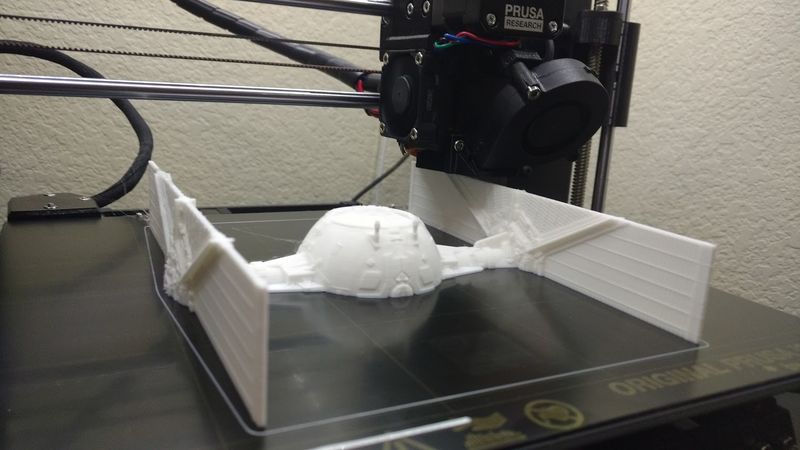
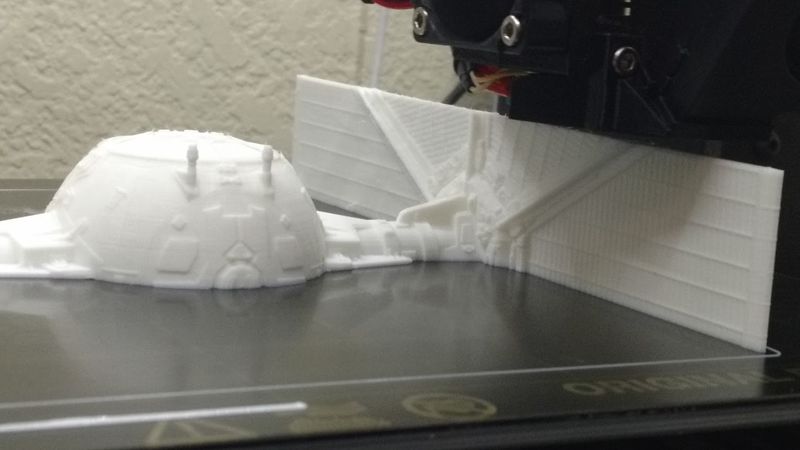
That half of the model is a 47 hour print. It's about going for about 24 hours in those pictures. I'm going to have to get the DSLR out to actually get good pictures of the detail, when it's done. Just looking at it while it prints, it's pretty impressive. The printer has done an admirable job with the detail. It has only had problems with one area, which turns out to be a problem with the model and slicing and looks pretty much impossible to print correctly on an FDM printer. It is actually an error, as the back half that matches up with it is even worse and actually has holes and floating pieces in part of the model. That's what led be to actually start looking at the model and how the slicer was interpreting it. So, I've pretty well progressed to the point where I have to pay close attention to what the slicer is doing to ensure I'm not asking something impossible of the printer.

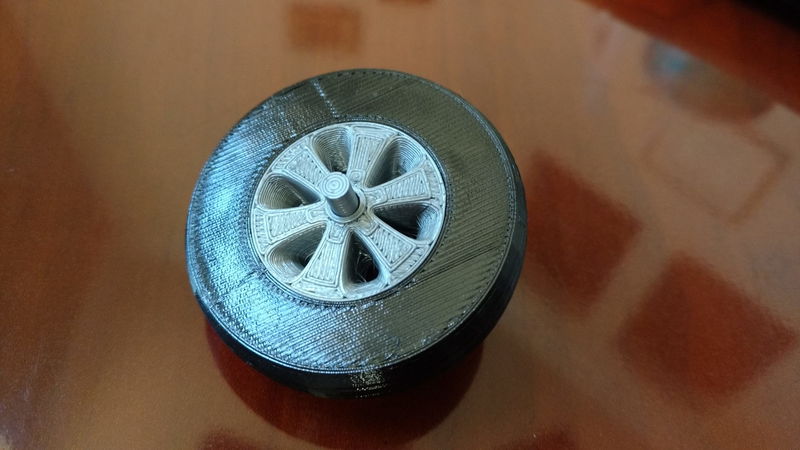
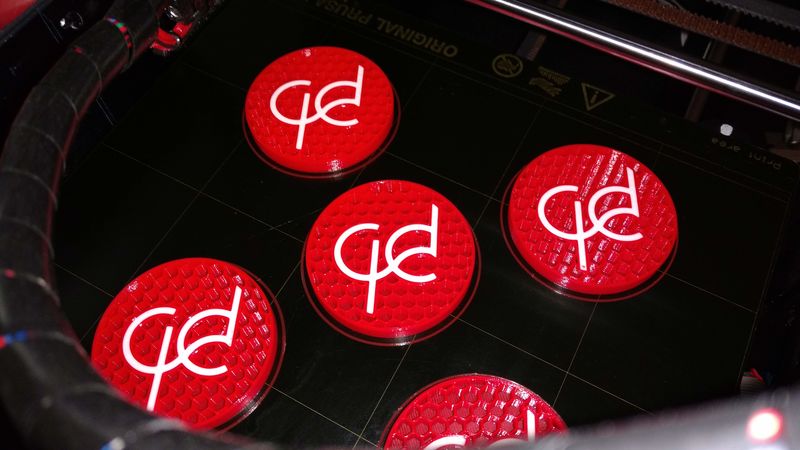
I'll spend some time, on occasion, browsing Thingiverse to see what neat new things people have created. Doing so, and looking at people's makes, has made me realize just how high the overall quality of the Mk3 prints are. Yes, there are some known issues with vertical artifacts on the surface, especially on faster prints, but when I look at the makes many people post, I can't help but think "man that's a crappy print". Now, to be fair, there are some spectacular makes posted, but I can make a pretty edjucated guess as to the "level" of printer that someone has from looking at their pictures. It certainly re-inforces my decision to get the Mk3. Yes, there is a fair amount of tinkering to get it dialed it, but once you do, it will turn out nice print after nice print (if you can avoid the desire to tinker and upgrade).

--SS
 
CScottG
Graphmaster Gerbil
Posts: 1252
Joined: Fri Dec 01, 2006 9:53 pm

Re: My thoughts on the Prusa I3 MK3 3d printer kit

Tue Feb 26, 2019 5:03 pm

..another great update, thank you! 8) :D
 
SecretSquirrel
Minister of Gerbil Affairs
Topic Author
Posts: 2726
Joined: Tue Jan 01, 2002 7:00 pm
Location: North DFW suburb...
Contact:

Re: My thoughts on the Prusa I3 MK3 3d printer kit

Tue Feb 26, 2019 11:02 pm

The front half print finished this afternoon. I pulled out my Nikon D7100 to get a few more details pictures.

Image

Image

Image

Image

Image

Image

Now, it isn't perfect. As I noted in my earlier post, there is a section of the hatch that doesn't slice at all well. As a result, it doesn't print well either.

Image

There was a fair amount of hair on the print, but most of it came right off, and the rest of it should disappear with some judiciously applied hot air.

A pleasant surprise was the complete lack of any warping or separation from the print bed. I was somewhat worried about the the panels separating and warping because of how thing they are. I printed the model with four bottom/top layers (0,4mm) and four perimeters (1mm). Infill was 20%. It has a good heft to it and feels surprisingly sturdy. All in all, I am extremely pleased with how it turned out. Might make me spend some time with Meshmixer to see if I can fix up the hatch area so it slices well. I've started the print of the back half, which will be another 48hr print. After that, the printer will likely get shut down for a while as I leave on a week long business trip late Sunday.

Final bit of 3d printer gratuitousness.... the timelapse of the print: https://youtu.be/2HVIRyohhjw

--SS
 
godforsaken
Gerbil
Posts: 58
Joined: Sun Jul 03, 2005 6:34 pm

Re: My thoughts on the Prusa I3 MK3 3d printer kit

Wed Feb 27, 2019 3:21 am

well, that's definitely something you don't often see on youtube.. or ever.. watching your video and glance at view count to see "No views" to make it even more confusing, there's even a thumbs up

anyways, thanks for the continuous updates, I know there hasn't been much back and forward in this thread, but, I doubt I'm the only one who has a mental note to watch for updates here, thanks for the, umm, updates? posts? segmented article, whatever..

lastly, Tie looks good, did you think of (if it's even thick enough to do this) printing a few holes up the solar arrays to maybe shove (gently) a few pins so they don't wilt? (I do hope you didn't silently shout 'doh!' when reading this)

P.S. would you be able to update the picture url of the transmission? I missed that post, and the links are out of date, and it peaks my curiosity
 
drfish
Gerbil Elder
Posts: 5546
Joined: Wed Jan 22, 2003 7:53 pm
Location: Zeeland, MI

Re: My thoughts on the Prusa I3 MK3 3d printer kit

Wed Feb 27, 2019 7:07 am

Still reading every update, thank you! That YouTube video is awesome, thanks for taking the time. :D
 
SecretSquirrel
Minister of Gerbil Affairs
Topic Author
Posts: 2726
Joined: Tue Jan 01, 2002 7:00 pm
Location: North DFW suburb...
Contact:

Re: My thoughts on the Prusa I3 MK3 3d printer kit

Wed Feb 27, 2019 7:50 am

godforsaken wrote:
well, that's definitely something you don't often see on youtube.. or ever.. watching your video and glance at view count to see "No views" to make it even more confusing, there's even a thumbs up

anyways, thanks for the continuous updates, I know there hasn't been much back and forward in this thread, but, I doubt I'm the only one who has a mental note to watch for updates here, thanks for the, umm, updates? posts? segmented article, whatever..

lastly, Tie looks good, did you think of (if it's even thick enough to do this) printing a few holes up the solar arrays to maybe shove (gently) a few pins so they don't wilt? (I do hope you didn't silently shout 'doh!' when reading this)

P.S. would you be able to update the picture url of the transmission? I missed that post, and the links are out of date, and it peaks my curiosity


Updated the links in the earlier post.

The solar arrays are actually quite sturdy. Other than the concern about warping during printing, they aren't going anywhere.

One a related note, I walked into my office this morning to check on the print of the back half and was greeted by "clunk.... clunk.... clunk...." of the extruder skipping. Looks like I get to tear the extruder apart again. :cry: There is a known issue with the idler shaft on the Bondtech gears that I'm hoping is the problem. While I've got it apart, I'm going to go ahead and replace all the PTFE.

--SS
 
FireGryphon
Darth Gerbil
Posts: 7729
Joined: Sat Apr 24, 2004 7:53 pm
Location: the abyss into which you gaze

Re: My thoughts on the Prusa I3 MK3 3d printer kit

Wed Feb 27, 2019 8:50 am

I love these updates and read every one of them. I am interested in at some point getting one of these for my school (thought this year, but it’s looking like next year now). I want something reliable, and it seems like you’re constantly tearing this thing apart and fixing it. How much of that is because you’re a tinkerer at heart, and how much of it is because the unit is sloppy? I can’t afford to be constantly fixing a school unit. It has to just work.
Sheep Rustlers in the sky! <S> Slapt | <S> FUI | Air Warrior II/III
 
Chuckaluphagus
Gerbil Elite
Posts: 906
Joined: Fri Aug 25, 2006 4:29 pm
Location: Boston area, MA

Re: My thoughts on the Prusa I3 MK3 3d printer kit

Wed Feb 27, 2019 12:30 pm

SecretSquirrel wrote:
There is a known issue with the idler shaft on the Bondtech gears that I'm hoping is the problem. While I've got it apart, I'm going to go ahead and replace all the PTFE.

Have you looked at the new design for the extruder that was announced a few days ago? I've run into a few issues with the extruder (especially with flexible filaments), but not to the same extent as you; I think you do a lot more with your MK3 than I do. At least when printing with PLA, I've had no issues with the extruder malfunctioning, but I'm definitely interested in the upgraded filament sensor, since the existing one in the MK3 is simply not up to the task.

I'm debating between ordering a new extruder assembly kit, or just caving to the desire of my kid and ordering the revised multi-material upgrade kit, which includes the new extruder. I'll get around to one or the other eventually, I'm sure.
 
Chuckaluphagus
Gerbil Elite
Posts: 906
Joined: Fri Aug 25, 2006 4:29 pm
Location: Boston area, MA

Re: My thoughts on the Prusa I3 MK3 3d printer kit

Wed Feb 27, 2019 12:43 pm

FireGryphon wrote:
I love these updates and read every one of them. I am interested in at some point getting one of these for my school (thought this year, but it’s looking like next year now). I want something reliable, and it seems like you’re constantly tearing this thing apart and fixing it. How much of that is because you’re a tinkerer at heart, and how much of it is because the unit is sloppy? I can’t afford to be constantly fixing a school unit. It has to just work.

I'm going to reply here based on my own experience, not speaking for SecretSquirrel:

I find my Prusa MK3 to be very reliable. I got mine mostly for personal education reasons (semi-related to my profession), assembled it from a kit last June, and it's been providing one or two small prints a week since then. I print almost exclusively in PLA, with a few projects calling for flexible filament (TPE). The printer has never once given me any trouble with any PLA I've used, but the TPE proved more challenging - I had to drastically slow the printing speed in order to prevent the filament from jamming in the extruder. Once I got that sorted out, though, it printed beautifully.

I have not replaced or modified any parts on my MK3 - everything is stock as supplied by Prusa as part of the kit. Nothing has failed, or looks to be moving in that direction.

Over the 8 months I've been using it, I've had to disassemble and clear the extruder assembly twice (that would be the TPE problem), and re-calibrate the first layer height three times. That's very straightforward, takes about ten minutes. There's a built-in calibration process that runs on the printer itself, and the instructions are provided in the printer manual. I think the need to re-calibrate the first layer height really just comes down to the very slight movement of parts over time, and changing ambient conditions with the seasons. I'm not sure how often you'd have to do it with a horde of kids barreling past the printer every day, and possibly thumping into it. The printer itself would hold up to that just fine, I believe.

Most importantly for me, I've found the printing to be consistent. If a print turns out right the first time, it's turned out correctly the third or fifth time as well. I use mine less than SecretSquirrel does his, but it does see regular use, and I'm pleased with it.
 
SecretSquirrel
Minister of Gerbil Affairs
Topic Author
Posts: 2726
Joined: Tue Jan 01, 2002 7:00 pm
Location: North DFW suburb...
Contact:

Re: My thoughts on the Prusa I3 MK3 3d printer kit

Wed Feb 27, 2019 2:55 pm

Chuckaluphagus wrote:
Have you looked at the new design for the extruder that was announced a few days ago? I've run into a few issues with the extruder (especially with flexible filaments), but not to the same extent as you; I think you do a lot more with your MK3 than I do. At least when printing with PLA, I've had no issues with the extruder malfunctioning, but I'm definitely interested in the upgraded filament sensor, since the existing one in the MK3 is simply not up to the task.

I'm debating between ordering a new extruder assembly kit, or just caving to the desire of my kid and ordering the revised multi-material upgrade kit, which includes the new extruder. I'll get around to one or the other eventually, I'm sure.


I've looked at the new extruder design and might order it at some point. There is also a Bondtech Mk3 extruder upgrade that uses a gear reduction drive. Neither has struck me as a "gotta have it" upgrade. I agree that the current filament sensor is not quite up to the task, or at least can be finicky with certain filaments. However, the new sensor will only cover running out of filament, it won't detect jams like the existing one can (theoretically). While running out is bad, it hasn't been a critical problem to this point.

I didn't have any trouble with the little bit of flexible filament printing I did. I printed with Ninjaflex TPU and had no problems at all. Now, I haven't printed large quantities yet, but I was surprised how problem free it was after reading up on it.

FireGryphon wrote:
I love these updates and read every one of them. I am interested in at some point getting one of these for my school (thought this year, but it’s looking like next year now). I want something reliable, and it seems like you’re constantly tearing this thing apart and fixing it. How much of that is because you’re a tinkerer at heart, and how much of it is because the unit is sloppy? I can’t afford to be constantly fixing a school unit. It has to just work.


I would actually not at all describe the Mk3 as unreliable. For the most part I would echo what Chuckaluphagus. Since I last reset the stats, I've run something like 50 days worth of print time with very little issue. Most of my problems were either self imposed, or not really problems and were just my nature as an engineer.

My first time taking the X carriage apart was an assembly error on my part.

Scoring on the Y axis rods was an assembly error on my part.

Swapping of the Y rod holders and installation of springs under the bed, for leveling, my engineering nature. Making the bed as level as possible from the start means much less work for the software to compensate.

Swap to 0.25mm nozzle was to try out higher detail printing.

Extruder teardown #1… not entirely sure the cause.

Extruder teardown #2 (this morning)… really not sure of the cause.

Note that both extruder tear downs came after switching to a 0.25mm nozzle. I had zero problems with the stock 0.4mm nozzle in six months of printing.

The vast majority of my print problems have been related to the complexity and difficulty of the model I’m trying to print. Printing very complex thin walled prints is just difficult. Along the same lines, failures due to differences between filaments and needing to tweak temperature and retract and stuff like that is also a “user error” type problem.

As far as “just working”, especially in a school setting, I suspect that depends on your definition of “just working”. It is a piece of precision mechanical equipment and will require maintenance over time. Bearings need lubrication every so often, belts need re-tensioning, filament build up will need to be removed, etc. These should be relatively infrequent. You will have to swap nozzles, especially if you allow printing abrasive filaments and really, what kid doesn’t want to make their widget glow in the dark. Even with regular PLA, you will eventually wear out the nozzle. You will have to deal with an extruder clog at some point. And especially in a school learning environment, I expect the worst problem will be blobs on the extruder. Somebody will try an print something that isn’t really possible to print and the resulting mess will at best result in a bird’s net printed in air, and at worst, a big blog of filament on the hot end. But really, none of that is specific to the Mk3 or any other printer. It’s just part of 3d printing.

FireGryphon, I don’t know if there is a library nearby that has 3d printers for public use or not. My local library has two different sets, one that the library staff runs and one that you can use directly. If there is one, talking with the staff there, especially the person who maintains the printer would likely be helpful. The staff guided printers at my library are an Ultimaker 3 and an Ultimaker S5. The DIY printer is an Ultimaker 2+.
 
SecretSquirrel
Minister of Gerbil Affairs
Topic Author
Posts: 2726
Joined: Tue Jan 01, 2002 7:00 pm
Location: North DFW suburb...
Contact:

Re: My thoughts on the Prusa I3 MK3 3d printer kit

Fri Mar 01, 2019 7:56 pm

So the extruder started skipping about 60% of the way through this attempt at printing the back half of the TIE Fighter. Luckily, I was working from home and heard the first clunk, then the second. It had gone less than a full layer before I paused the print. I was still extruding, but was skipping. When the extruder motor was able to pull the filament up. When I went to remove it, it was jammed and I had to pull pretty good. When I get a chance, I'll upload a picture of the end of the filament. It's got a 3-4mm plug on it. I trimmed the filament and reloaded it. It's been print normally since.

After a bit of reading over lunch, here is my theory on what is going on.

I'm printing in an enclosure, so the ambient temperature is higher. I checked today at it was about 35C. The steppers on the Mk3 run warm as it is. The model I'm printing has a huge number of retractions in it, making the extruder motor work much harder than normal. On top of that, I'm printing with a 0.25mm nozzle, making the extruder work a bit harder there too. Because the extruder is direct drive, the heat from the extruder motor will heat the Bondtech drive gear. The extruder motor is about 50C. So you have warm filament, being further warmed by the extruder drive gears. Now add in the large number of retractions, which bring melted filament up into the heatbreak slightly. Since the ambient temperature is higher, the heatbreak and heatsink don't do as good job and you get heat creep. Its just enough to slowly soften the filament in the heatbreak and over time it deforms into a plug. Because the extruder gears are so warm, they soften the filament enough to lose grip and can't force the soft plug down fully into the nozzle. Once the extruder starts skipping, the soft plug starts cooling and becoming a hard plug.

I verified the nozzle isn't plugged. When I reload trimmed filament, it starts extruding nicely, immediately. The plug, on the end of the filament I pulled, will pass through the PTFE tube without problem, but requiring a good bit of force because of the friction.

Apparently its a bit of a problem with PLA in enclosures without temperature control capabilities. For the time being, I've slightly opened to doors of the enclosure. There is a slightly visible defect in the print where the extrusion started to get low due to skipping, but it I didn't point it out, you probably wouldn't notice it. Otherwise the print if proceeding well. Its a bit hairier than the front half was, but nothing that running your hand over it, and maybe a quick shot from a heat gun, wouldn't fix.

--SS
 
JustAnEngineer
Gerbil God
Posts: 19673
Joined: Sat Jan 26, 2002 7:00 pm
Location: The Heart of Dixie

Re: My thoughts on the Prusa I3 MK3 3d printer kit

Fri Mar 01, 2019 8:16 pm

Any wagers on how long it'll be before Secret has some finned heatsinks or a small peltier cooler epoxied to his extruder?
https://dilbert.com/strip/2018-06-03
· R7-5800X, Liquid Freezer II 280, RoG Strix X570-E, 64GiB PC4-28800, Suprim Liquid RTX4090, 2TB SX8200Pro +4TB S860 +NAS, Define 7 Compact, Super Flower SF-1000F14TP, S3220DGF +32UD99, FC900R OE, DeathAdder2
 
CScottG
Graphmaster Gerbil
Posts: 1252
Joined: Fri Dec 01, 2006 9:53 pm

Re: My thoughts on the Prusa I3 MK3 3d printer kit

Sun Apr 07, 2019 6:37 pm

Who is online

Users browsing this forum: No registered users and 1 guest
GZIP: On