
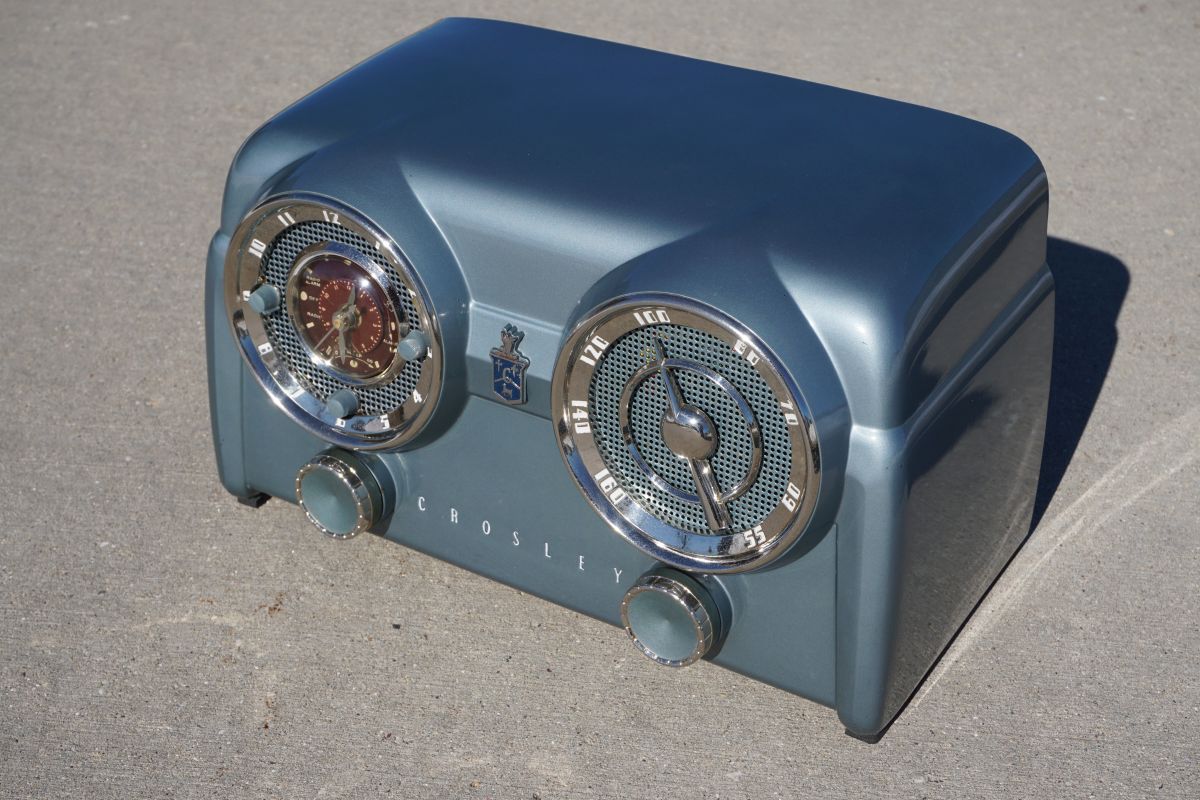
Needless to say, the original system was retired pretty quickly and replaced with the HTPC system in my signature. Being mITX, it obviously drowned inside the original case, and that has been a thorn in my side for quite a few years since. We recently got a new [white] entertainment center, so taking away the case's only saving grace of being a chameleon, I had to do something different. I obviously started by looking at "traditional" cases, but I just couldn't shake the desire to have something that also added a decorative element to the living room. I thought about the old staples of NES or PS1 case mods, but that's been done a thousand times. Then I thought about things that might already be in a living room and came up with the idea of a radio. While doing some research, I immediately fell in love with the look of the Crosley D-25 (circa early 1950s). The problem was, fully restored ones are terribly expensive (~$350) and wood radios aren't any cheaper. Plus, I really didn't want to "destroy" a beautiful piece of American history. After months of searching, I finally found a Crosley D-25 that wasn't absolute trash, but also wasn't restored/working, so I pulled the trigger, and here's what I got:


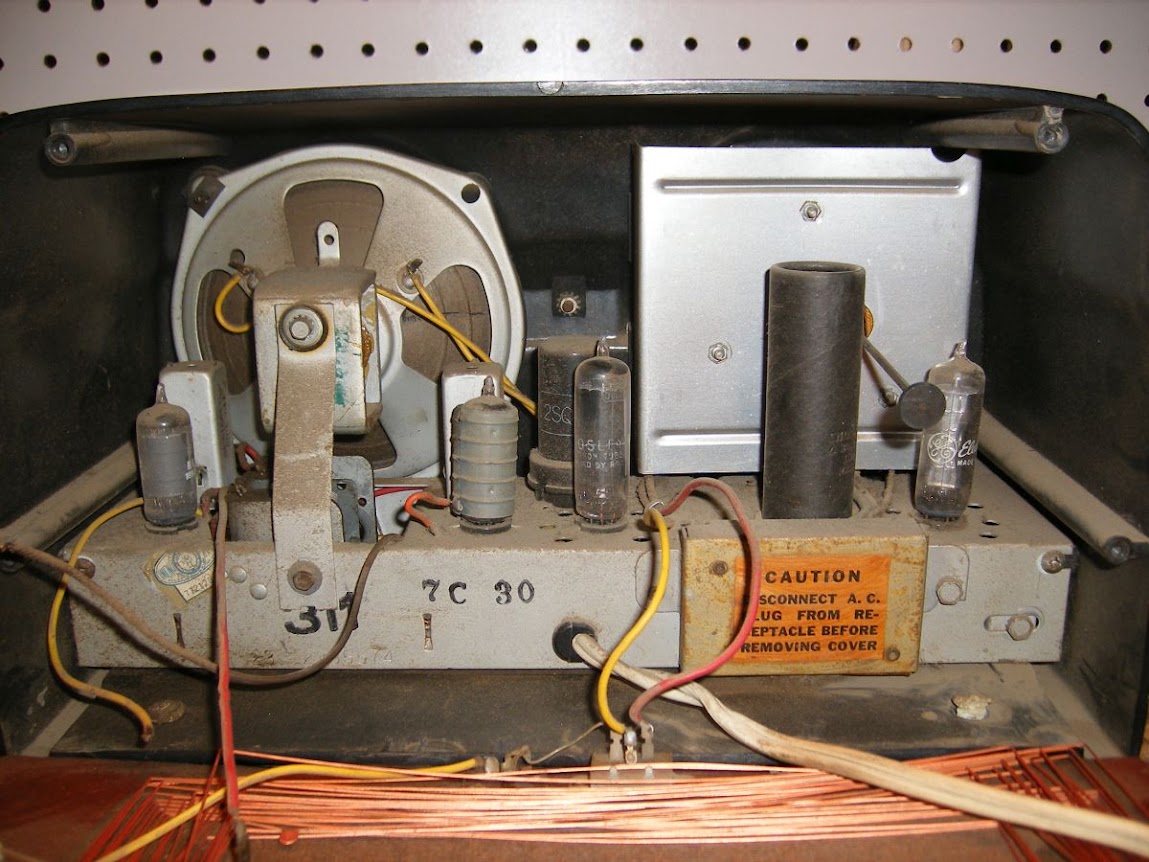
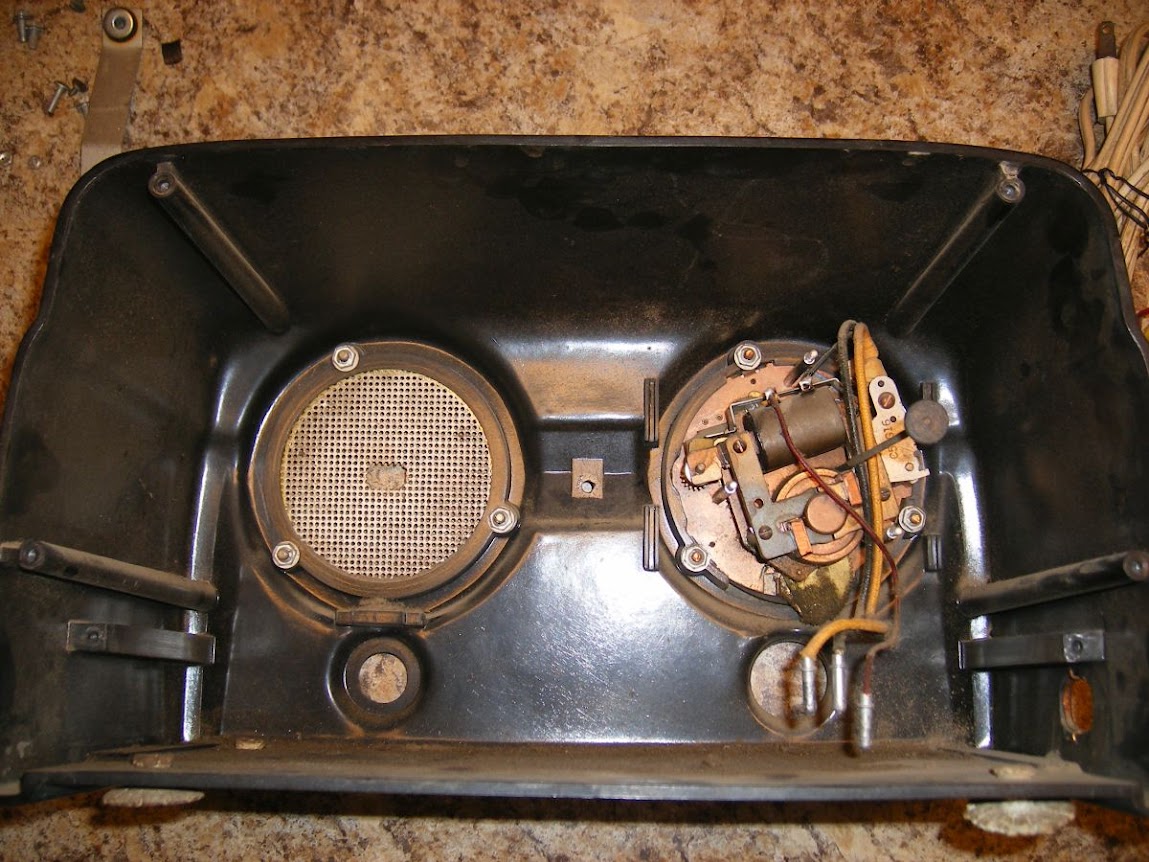
The first thing was to strip all the insides out and clean the things I wanted to re-use. I wanted to retain all the original functionality of the radio: clock, tuner dial, and volume.

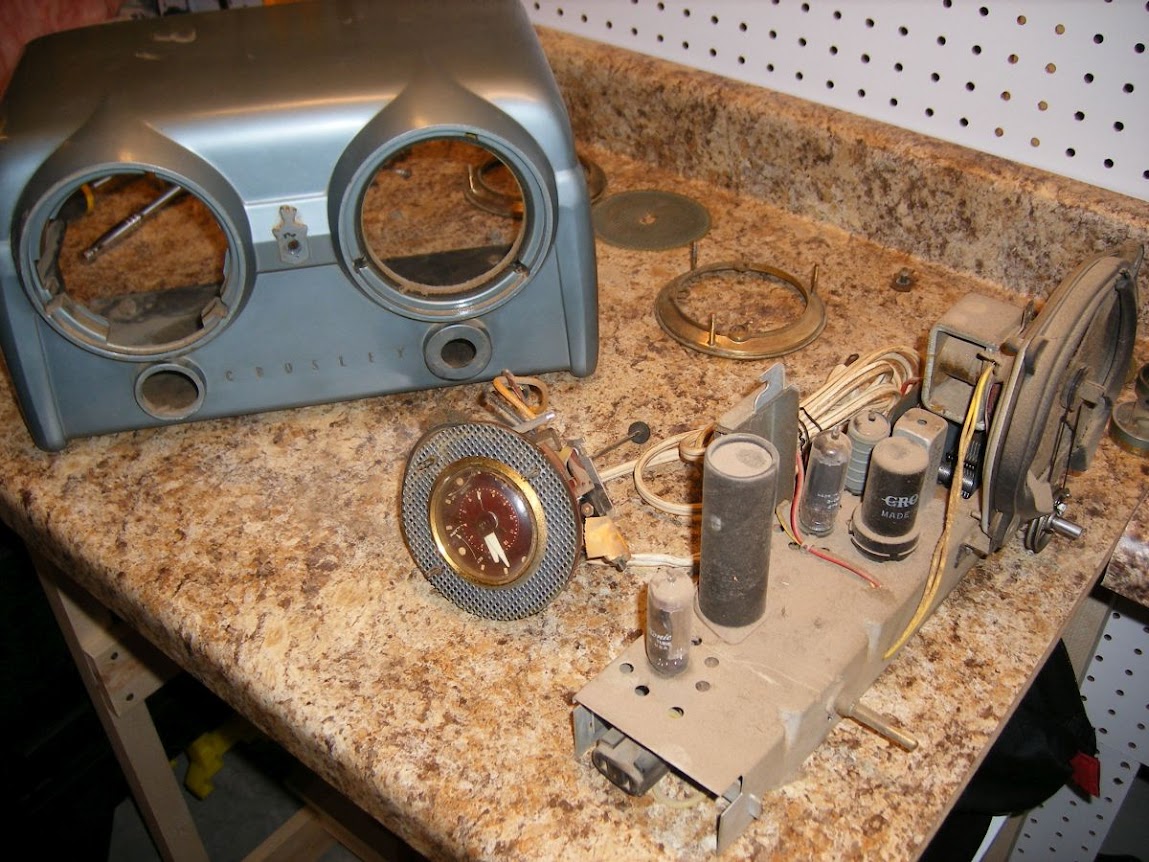
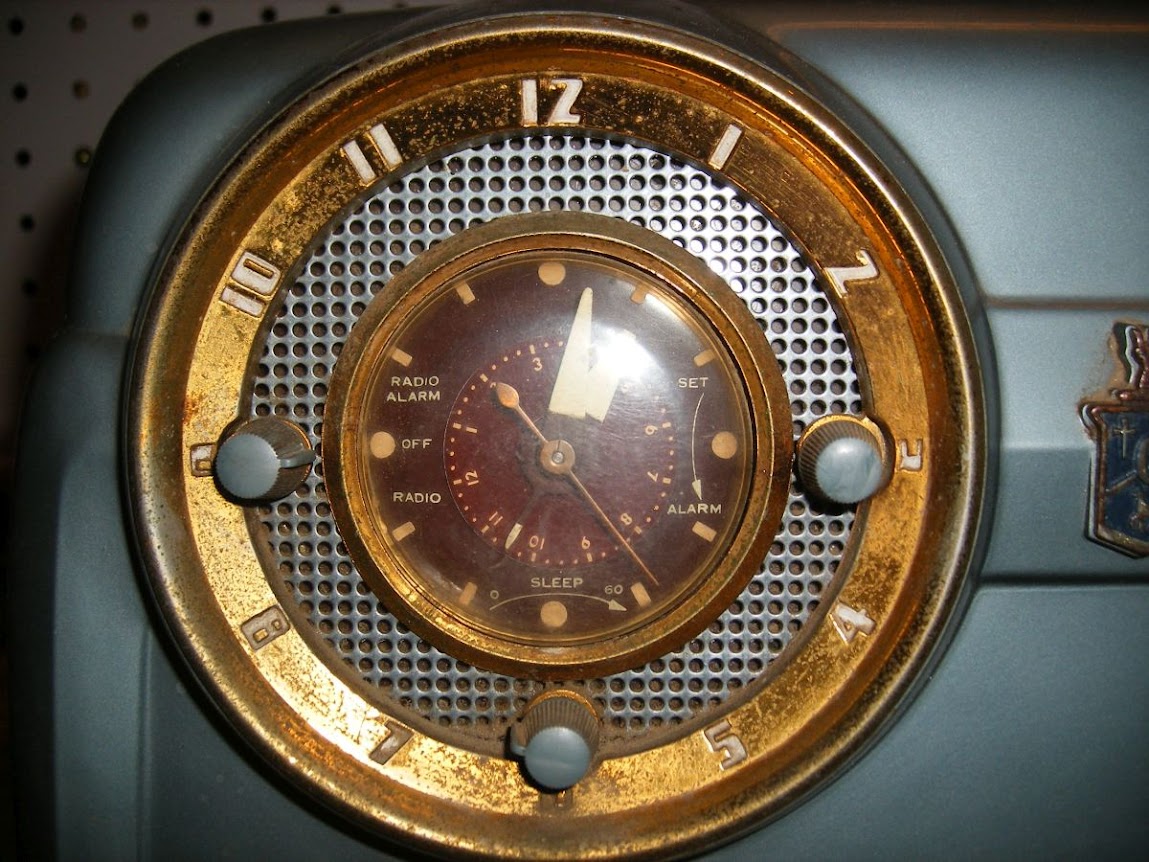
As you can see in the above pictures, the metal was pretty heavily pitted and tarnished. I got some metal polish and tested it (zero inconspicuous locations) and it seemed to work fine, so I went to work. Unfortunately, once I got to a spot that had faded, I found out the metal is actually plated, and the plating came off, exposing the shiny silver color underneath.....I decided there was nothing to do but continue removing all the gold plating. I'd thought about taking the metal somewhere to be re-plated, but decided that the silver color was more modern and fit the room decor better. Besides, I can always take it in to be re-plated if I change my mind in the future. The polishing took an ETERNITY. It was all done with a sock and metal polish because I was afraid a chemical bath would strip the white paint off the numbering. In the end, the metal still shows minor signs of pitting, but it shined up very nicely. I don't mind the pitting, it gives it character, this is a 65 year old radio after all.
The case was polished with car buffing compound. The paint(?) on the case was very good still, no scratches down to the black/brown bakelite or chips. The finish was a bit dull, but didn't take much with the buffing compound to restore it to a good luster. The front emblem was tarnished brown and had to be sanded with 400 grit sandpaper.
The clock was an AC unit, gear driven, and took up far to much space inside. This seemed like an easy fix. I got a continuous sweep motor (doesn't tick) to match the original. Problem was, the shaft diameter doesn't match today's standards, so the original hands couldn't be re-used. I also couldn't find any hands that were as short as the originals. So I had to cut some down to size. Also the shaft length of the new motor (shortest I could find) was still longer than the original, so the second hand stood out too far and hit the cover (it looks glass, but it's plastic). I had to take the second hand to a jeweler to have the shaft modified because I didn't have tools small enough. Unfortunately, the hands were gold plated also. There was no way I was going to be able to physically polish off the plating like I did on the other pieces, so I turned to paint stripper. 5 days later, silver hands!

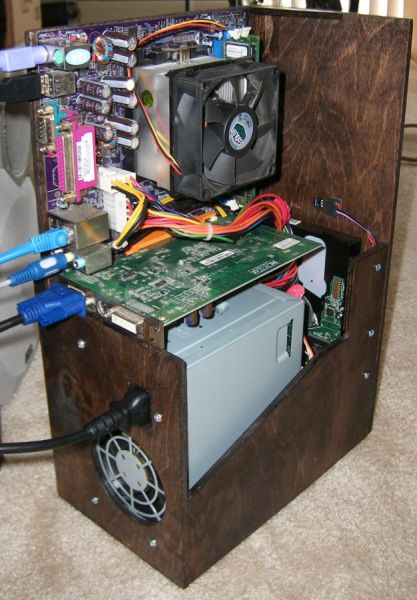
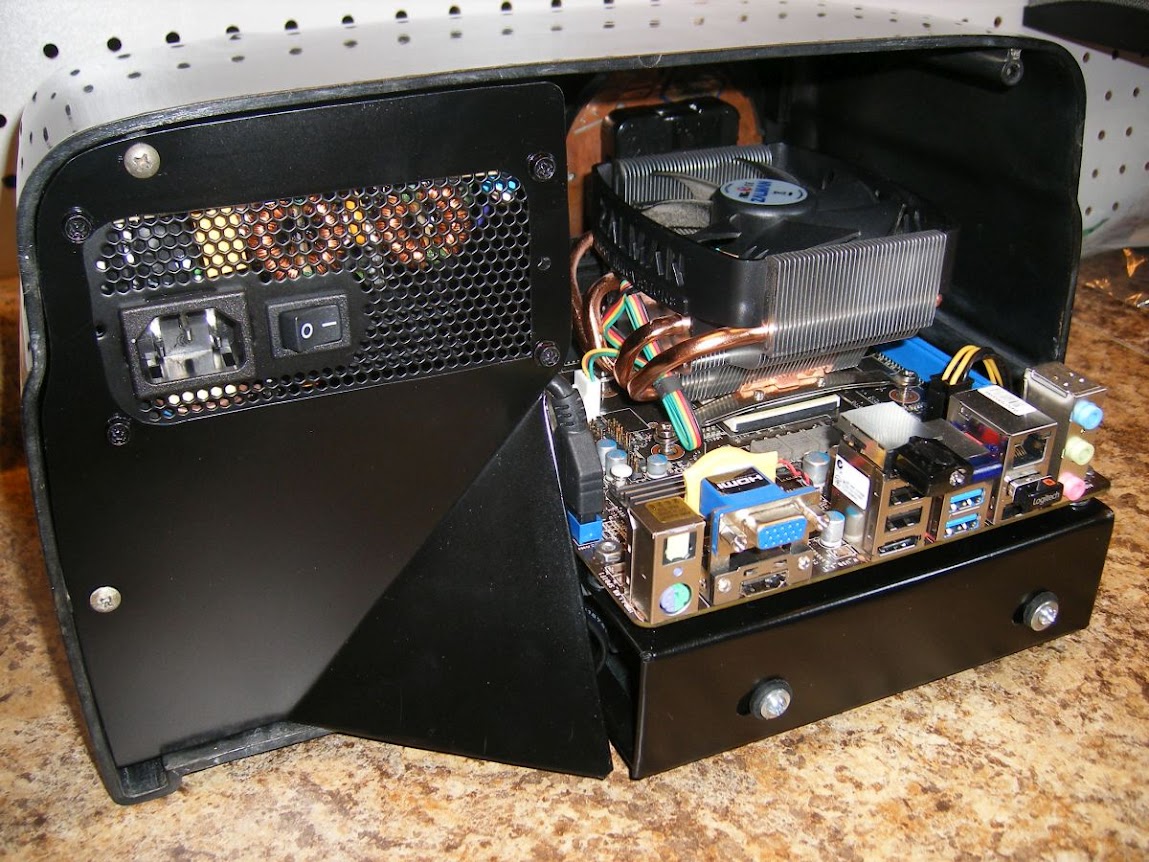
Then I had to figure out how to cram a computer into an enclosure that only measures 7"H x 13"W x 6"D..... Many hours later, I decided that I needed the motherboard to protrude out the back a bit (cooling/expandability/workability/fabrication/etc etc). I then had to fabricate a motherboard tray. First a template was made with folded/cut paper. Then I bent [~22-26Ga] sheet metal to match the template. Edges were folded for added strength and reduced blood spilling. The motherboard tray was connected to the original frame and protrudes 2.25" out the back of the case to house the 4TB hdd (mounted on rubber grommets) and a 250GB SSD. Completely coincidence that the clearance between the two was 1/8" or less.
I actually had to buy a Silverstone 300W SFX power supply to fit the remaining space. This model was chosen because it is the only model with semi-passive fan operation. The panel mount for the PSU was fabricated similar to the mobo tray using a paper template. The triangular bend at the bottom was...a challenge, but it hides the cables from the hdd and SSD. It does fold back under, parallel to the bottom of the case so the cables don't spill out the bottom. It took me about 10 hours to fabricate EACH of the two metal pieces.
I even mounted a USB3.0 port to the side of the case! This hole was originally an auxiliary 2-prong AC output.


And lastly, here are some pictures of the final product. The "Crosley" letters were re-painted as well as some touch-ups on the clock ring numbers, the fabricated metal was painted black (original frame was not painted because of the neat stamping and stickers), cables were crammed in, and everything was zipped up.
I really wanted to light the clock to the motherboard's power LED header, but my white LED's were a really cold/blue white and I didn't like the look. I'll probably search around for some warm white LEDs.
Also, the power was originally intended to be wired to the volume knob under the clock, but Digikey couldn't find me a rotary switch. For now, it'tl be handled by a standard push botton on the back and/or power on via keyboard. I'm open to suggestions on some sort of rotary-type switch I could use. Ideally it would be a momentary/spring loaded switch to match the behavior of what a standard computer power button delivers. The knob is just attached to the end of the original potentiometer so it still rotates.
I know this is a long post, but hopefully everyone enjoys it. This really turned into a pièce de résistance for me and I'm really happy with the outcome. Unfortunately I feel like I set the bar pretty high for myself, this is going to be a tough one to beat.


