There's been some discussion in various threads about undervolting GPUs to cut down on power/heat/noise, so I figured I'd share my findings here and make a place where others can share their results about cutting power consumption without giving up performance
This is a rudimentary guide from my experience undervolting my RX480
First off, there are many power saving options offered in the AMD settings. "Power Efficiency", Frame Rate Target Control", and "Chill". If your GPU is not restricted by thermal/voltage/power throttling, then it will run at its highest frequency in games unless you enable one of these features.
Power Efficiency: Not 100% sure what this setting does behind the scenes, but I was able to use it effectively in Rise of Tomb Raider to lower power draw by an average of 15W without affecting framerates. I used that feature while Global Wattman was set to Auto voltage. I don't believe this feature works as soon as you disable Auto voltage.
Frame Rate Target Control: This feature allows the GPU to dynamically down-clock itself to only deliver a max of the target frame rate. This has obvious power saving benefits depending on how un-demanding a particular game is. A good choice for non-variable refresh rate monitors.
Chill: Works similar to FRTC, with some added features. Easier to just point you at TR's article on Chill. In addition to a maximum frame rate, Chill will also reduce the GPU frequency to a minimum frame rate (set by you in the game profile) in scenes where there is little/no movement on screen.
Now, to the undervolting. To do this in AMD Wattman, you'll go to Global Settings -> Global Wattman and toggle the GPU Frequency (on the left side of the window) from % to Dynamic, and Voltage Control from Auto to Manual. This will populate the GPU core voltages from State 1 to State 7 (these are load states), as well as the memory frequency State 1. Write down the all 7 core frequencies that are displayed.
As mentioned before, as long as you're not hitting power/voltage/thermal limits, the GPU will/should always operate at the highest set frequency (typically State 7). To test any frequencies lower than that (take State 4 as an example) you'll need to set all core frequency states above that (States 5-7 in this example) at that same frequency.
An important thing to understand before you start is what the Memory Voltage does. Look at the GPU core Frequency/Voltage table you've just exposed. As the GPU core frequency decreases, it needs less voltage to keep it stable. Simple. However, unlike the GPU core that can change it's frequency, the VRAM always runs at a fixed speed under load (and a single lower speed when the card is idle). There is a necessary amount of voltage required to keep that VRAM stable also. The card always feeds the GPU core voltage to the VRAM also (you can see this if you look at the VRAM Voltage Out VOUT/VID and compare that to the GPU Core Voltage VDDC in HWMonitor). The "Memory Voltage" setting acts as a lower limit for the GPU core voltage to prevent feeding too little voltage to the VRAM and causing it to become unstable/crash. The reason we need to test for a minimum Memory Voltage here is to make the most out of power saving features like FRTC or Chill. If your Memory Voltage is set to the same value as the State 7 core voltage, the card may drop to lower frequencies, but the voltage will never go down. The more core States you can "open up" with a Memory Voltage that's lower than they are, the more flexibility you and/or your card has to adjust the power/heat/noise it's producing.
To test for the lowest stable VRAM voltage, you'll need to test the GPU core at a frequency that has a corresponding core voltage that's equal to or lower than the Memory Voltage you've set. This will enact the Memory Voltage limit, feeding the set minimum amount of voltage to the VRAM. You want to make sure here that you're not using a core clock and voltage that causes instability. So, say your core State 4 frequency has a voltage that matches your Memory Voltage limit. It would be a good idea to set States 4-7 at the same frequency as State 3 so you've got a conservative amount of voltage keeping the core stable here. I was able to do 2000MHz VRAM @ 920mV.
Once you get a stable memory voltage, set all the core States back to their default frequencies and voltages. Then lower the voltage for State 7. Depending on what your particular GPU's advertised boost clocks are, and ASIC quality, will determine what the core voltage can be. My 1305MHz state is plenty stable at 1030mV for example. Test your settings for State 7.
Next, set the State 7 frequency and voltage equal to the values in State 6. When you benchmark (with power saving features off), the GPU will ramp up to State 7. Again, in order to test the lower States, you'll need to set every State higher than the one you're testing to be equal (ie. if you're testing State 4, frequency and voltage of States 4,5,6,and 7 need to be the same). Proceed down the states as far as you like. I tested States 5-7.
I found that creating an Excel scatter plot of my Frequency/Voltage curve helped visualize what intermediate states should be if you don't want to test for voltage at every state. If you set the Voltage Control toggle back to Auto at any point, there's a good chance your voltage curve will be lost, so it's nice to have a record of what you found stable.
Once you've got your settings dialed in, at the top of the window you can select "Save Profile" so you don't have to enter all these values again later if you're tinkering.
Quick tips:
- The GloFo 14nm process that AMD RX4xx and RX5xx series are fabricated on has a common inflection point around ~950mV. Above that voltage, the slope of the Frequency/Voltage curve steepens.
Recently, AMD has expose an additional tweak called "Memory Timing" located on the left side of the WattMan window just above the Memory Frequency. I have tested this to produce up to a 5% increase in performance using "Timing Level 2" at the same core clock and voltage compared to "Automatic/Stock". You'll want to retest your Memory Voltage if you change this to anything except Automatic.
The "Memory Voltage" setting acts as a lower limit for the GPU core voltage to prevent feeding too little voltage to the VRAM and causing it to become unstable/crash.
Although undervolting opens up additional voltage/power headroom, [especially] if you're OCing, you may need to increase the "Power Limit" slider so your card can take higher voltages and reach higher clocks.
I've noticed that some systems don't apply the manual WattMan profile accurately on cold boot. A restart fixes this issue for the current power on session.
One last thing. If you prefer not to use power saving features like FRTC or Chill, or if FRTC or Chill are not working for your particular game/program, you can enable game-specific frequency curves by clicking on the game in AMD settings and navigating to Profile Wattman. This is also where you set the upper and lower bounds of frame rates for Chill.
TL;DR, here are the settings I tested stable on my MSI RX480 Gaming X 8G:
Some people like to also reduce maximum frequency to avoid the range of exponential voltage increases needed to maintain higher frequencies than a GPU/architecture is comfortable with (AMD Hawaii GPUs were notorious for being pushed beyond their comfortable range by AMD). My personal opinion is that I paid for the clock frequency of my card, so I'm not going to give that away. Hence I'm only doing voltage adjustments and leaving my card's frequency curve alone.
ASIC Quality = 80.1%
Memory Voltage = 920mV at 2000MHz (8GHz effective)
Core Frequency/Voltage = 610MHz/818mV - 910/865 - 1075/900 - 1145/920 - 1190/935 - 1235/950 - 1305/1030.
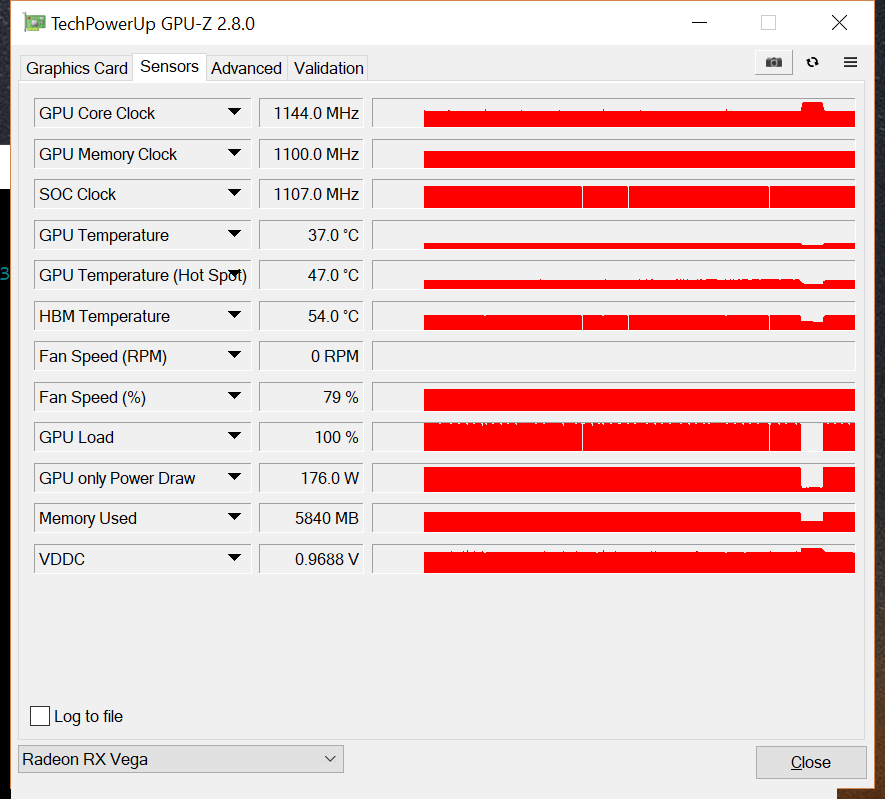
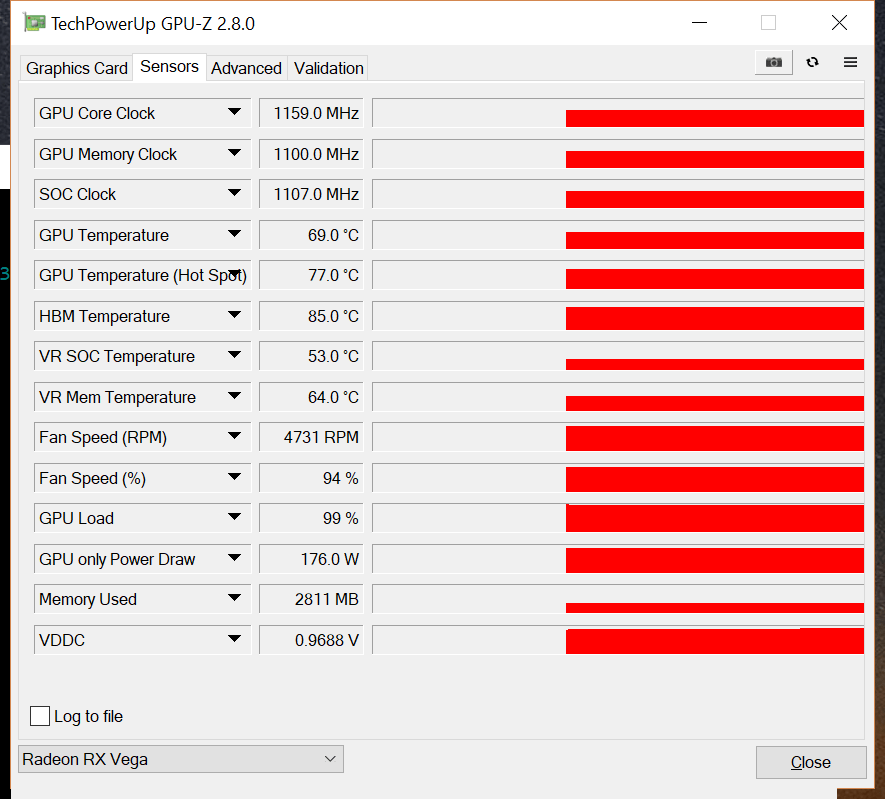
Power usage as reported by GPU-z: Doom - Vulkan = 135W@1305MHz, 110W@1235MHz. Furmark = ~100W@1305MHz, and ~80W@1235MHz. Auto voltage setting wanted 1150mV for 1305MHz = 130W in Furmark.
[Updated after more testing in the 1190MHz-1235MHz range.]
Share your results!!